Turning a Fox into a Snake

AC Bill

Well-known member
It was requested that I post a thread that shows a bit about the project that I have undertaken to build a AC Cobra replica. In doing so I mention the kit manufacture, and CND distributor, which is not intended as a blatant promo, nor a disregard for other kit makers, it's simply what I am familiar with.

The basis of the FFR (Factory Five Racing) S/C 427 roadster kit, is to use a Mustang 87-2006, as a donor car to complete the kit. They designed a kit intended to keep the cost down for the average builder. I would expect that at the very least, a CND builder would spend in the $30,000 range. There really is no upper $ limit..

First, FFR needs to be informed as to what year Mustang you are using, so they can supply the correct kit, with the proper motor mounting points welded in, as well as a few other important things. So before ordering you need to plan out your build carefully. Perhaps even buy a donor car, or arrange for the parts needed from a wrecker, prior to ordering the kit, so you know exactly what you are going to work with. Plus, you can start to clean, paint, or overhaul the stuff while your waiting for your kit to arrive.

The later model Mustangs with the 4.6 modular motor, have advantages, and disadvantages. The advantage is that you are using a newer, more powerful engine. The disadvantages are that the donor engine and parts, being newer, initially cost more, as well the wider engine can constrict foot box space. If you have big feet, or are a larger person this can be a pain.

The earlier Fox Mustangs 87-93 have advantages, and disadvantages as well. Advantages; usually the donor, or parts from the earlier Mustangs are fairly inexpensive, and readily available. Bolt on performance parts are also plentiful for the 5.0. You have additional leg/foot room using the narrower engine. The disadvantages; the motor, and other needed parts, are often high mileage, and frequently will need overhauling, or at least some freshening up. Cleaning and painting can be a bit more of a pain, dealing with rusty bolts, etc..

NOTE; The later (89-93) MASS Air EFI cars are preferred, over the Air Density models. Some opt to convert them to carb, so in this case it really doesn't make a difference. The "World Class" Tremac T5 is also the preferred donor tranny, as they are a little stronger built unit.

The third option is to purchase all the new parts that are required to finish the build, and either a crate engine, or a complete rebuilt. Obviously this is the most expensive route, but does have advantages as you can imagine. (You can also mix new and used as you feel fit, perhaps to offset some expense).
UPDATE-The new Coyote engine can now be used in the FFR;(Summer 2011)

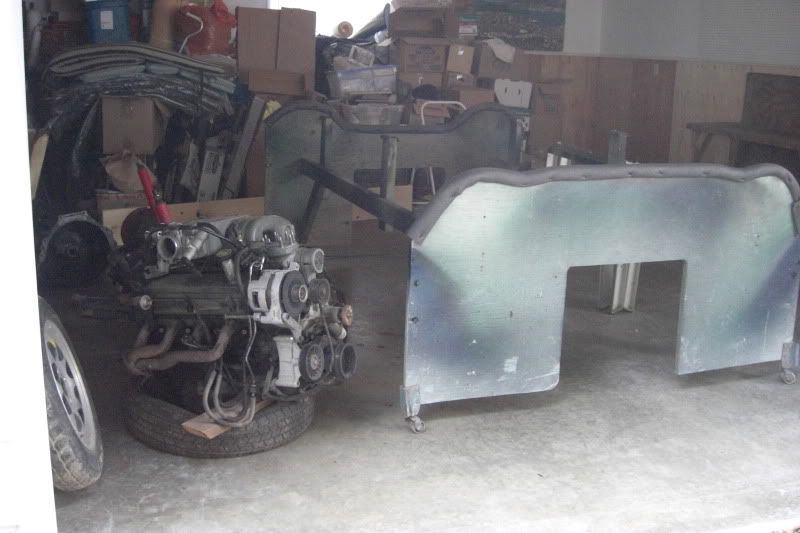
I chose to use a 90 GT as the base for my build. Rather than buying a donor car, say from the Buy and Sell, and driving it home, to begin the stripping process, I chose to have the wrecker strip the parts needed, and simply truck them home. Now some builders have had pretty good luck by stripping the donor at home. Any good left over body parts, lights, exterior trim, glass, and interior parts, etc. can be sold. This can really reduce the overall cost of the parts you need! Problem is with doing it this way, is you eventually end up with a carcass in your driveway, you need to get rid of. Its often a bit messy, IE; oil stains, etc. on the driveway, and your neighbors/Wife/landlord may hate you for it.
tongue.gif


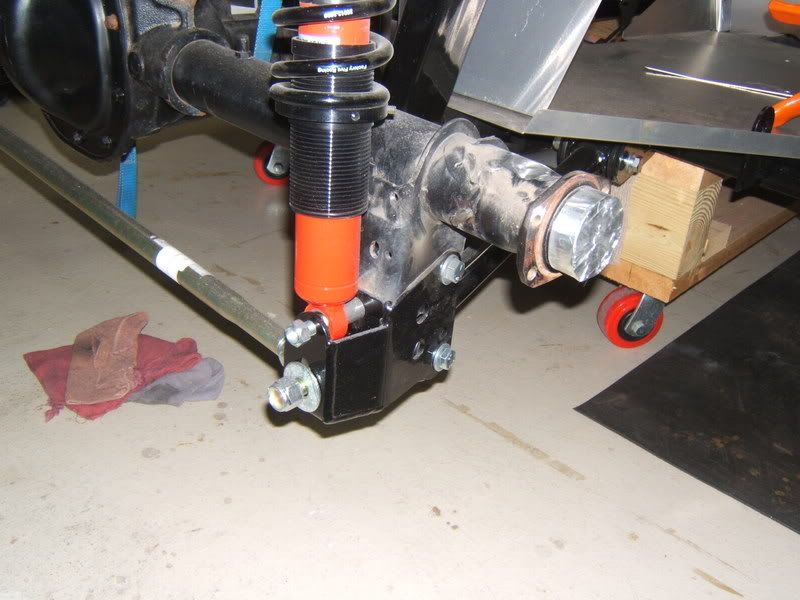
FFR provides a list of the items that are required to be stripped from the donor car, and it is pretty thorough, as I have found. The major parts are the engine, tranny, rear end, complete wire harness, pedal box, radiator, steering rack, brakes, and some of the front and rear suspension. There is a mess of smaller parts as well like the e brake handle, horns, and misc. brackets. Even the gauge cluster can be used, as it can be cut up, and new round gauge bezels and glass supplied with the kit, give the dash the more original look.

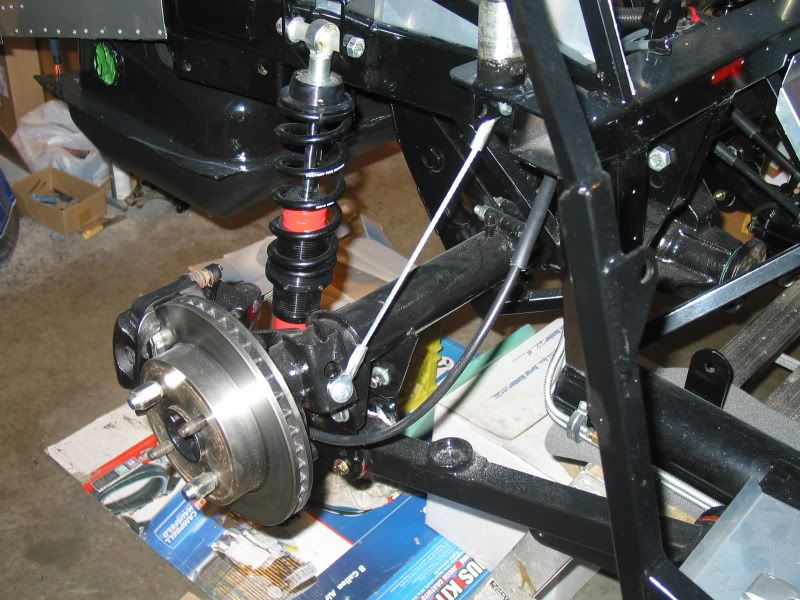
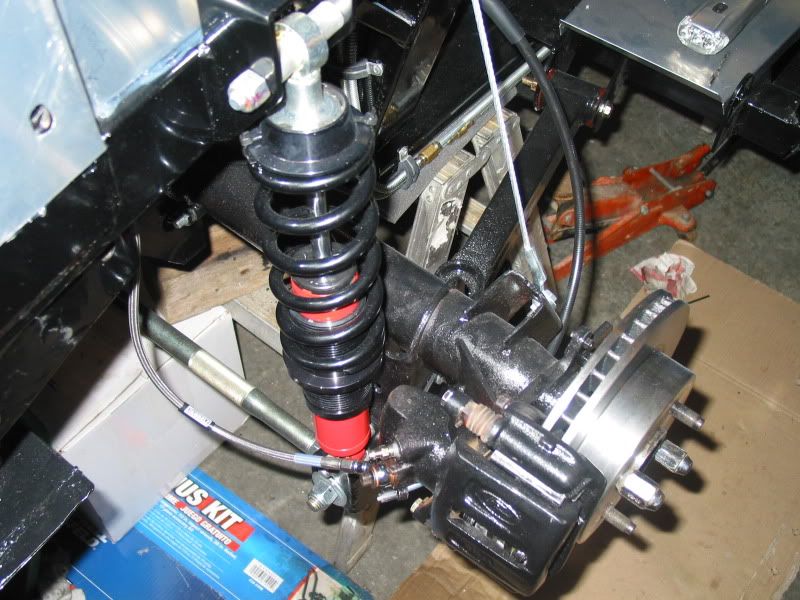
Now many builders won't bother with some of these used parts, as they are after all, building the car of their dreams. Many things will be bought new. I bought a new radiator, rebuilt calipers, rotors, and a few other things that I didn't want to chance from the donor car. You find things as you go on with the build.

The importing of the kit into Canada is not really that bad. You have to be patient with the DOT approval process, which can take several weeks. FFR has worked with the DOT, to keep things as smooth as possible, for us to import. Go to this LINK to and click on "Canadian customers" on the right side of the screen, then click on "Canadian import procedures" on the right side of the screen to get the details.. Mk3 Roadster UPDATE; As of early 2010 a new improved MKIV version of the roadster is now available as detailed through this same link provided.

NOTE; to make it possible to import these kits into Canada, FFR has had to delete some of the parts, (to meet DOT requirements), usually supplied with the kit. It has been a sore spot with CND builders, as the price of the kit remains the same, even without these items that US builders get included. These deleted parts include things such as the fuel and brake lines, T's and other line fittings, and some nuts and bolts type of stuff. In addition some options can not be ordered direct from FFR, although you can order them from other suppliers in the US..go figure..The base kit deleted items, will cost you around $6-800 dollars additionally. Some of the optional items like the Koni Coil-overs may run another $600+/-. Depends on what you want.
Deleted items link. http://www.factoryfive.com/canada/Ca...Deletions1.pdf

You can purchase the kit directly, or through the Canadian distributor, Western Canada Cobras. I chose to use WCC, as the price is the same, and he takes care off all the DOT importing paperwork, shipping arrangements, taxes, duty, etc. The headache crap. Basically you send him a cheque, and then patiently wait.
Builders in Eastern Canada, may opt to save the shipping/crating charges, drive to Wareham, Massachusetts (about an hour south of Boston), and pick the kit up. I opted to have it shipped. There is an additional crating fee if you have it shipped vs picking it up.

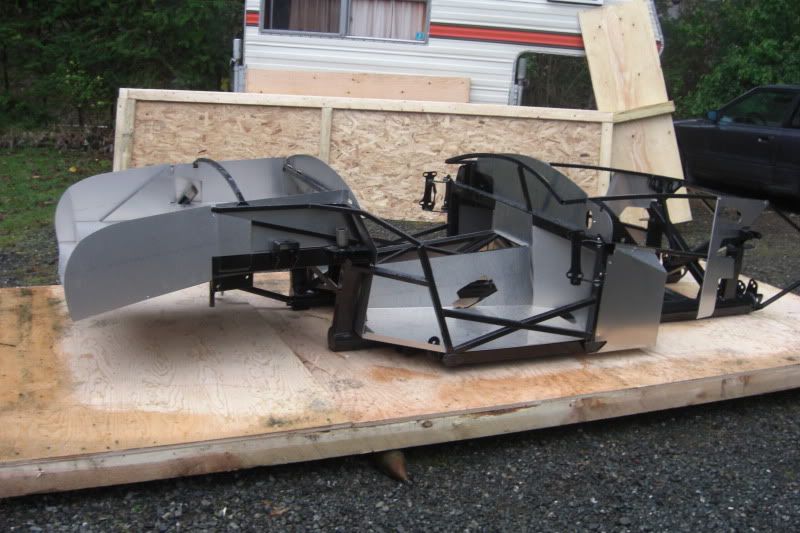
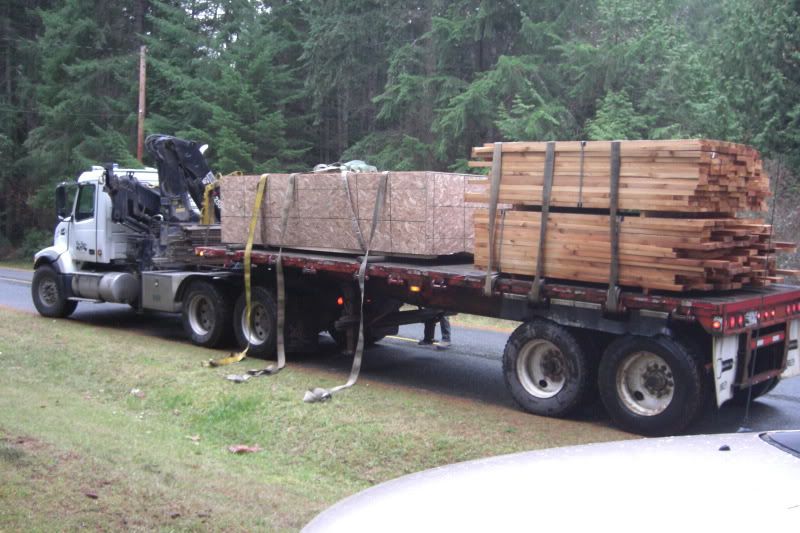
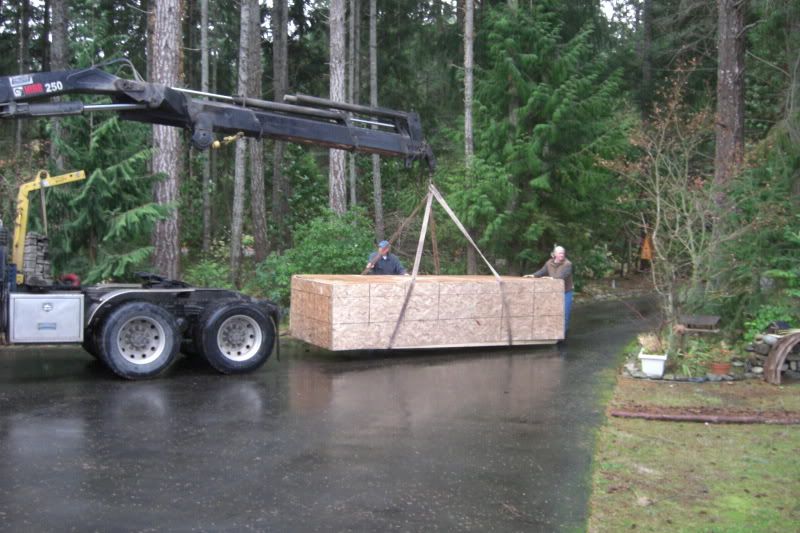
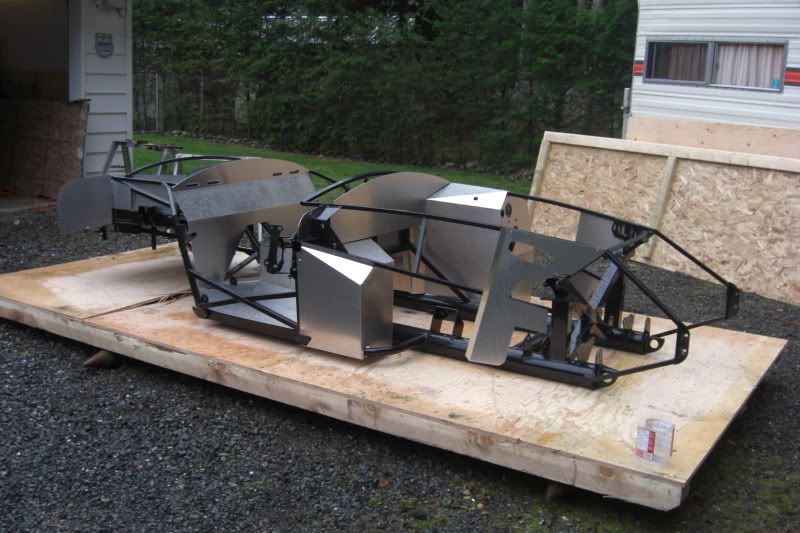
ARRIVAL DAY. The kit arrived on a cool rainy day, approx three months after ordering and paying for it all. The semi trailer truck was too large to turn up my driveway, but fortunately the truck was equipped with a HI- Up.
CIMG2994.jpg

CIMG3009.jpg

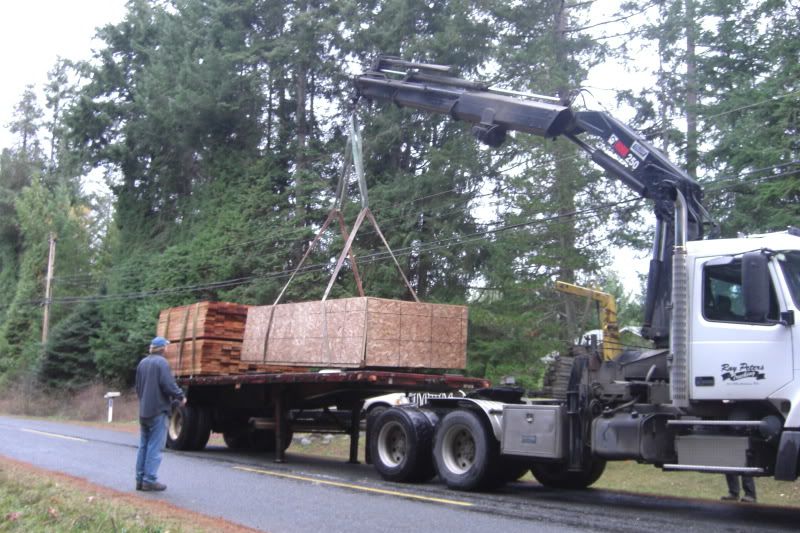
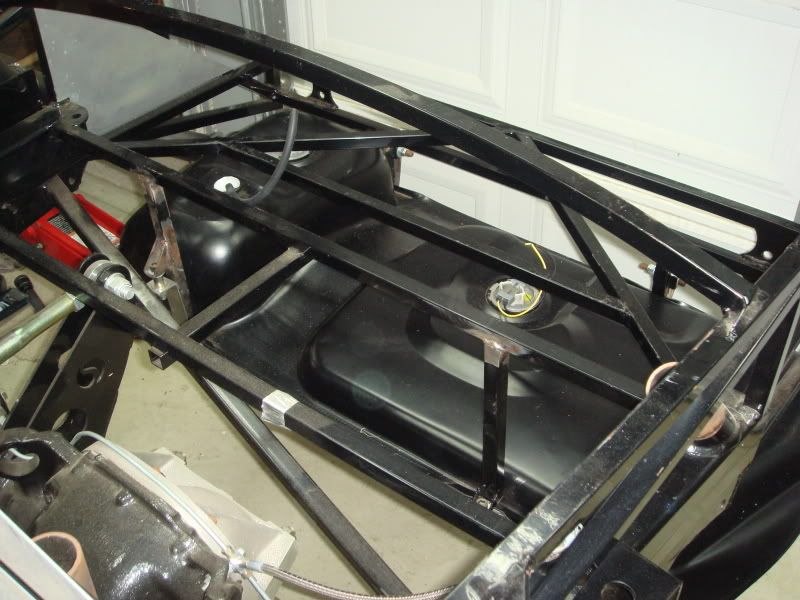
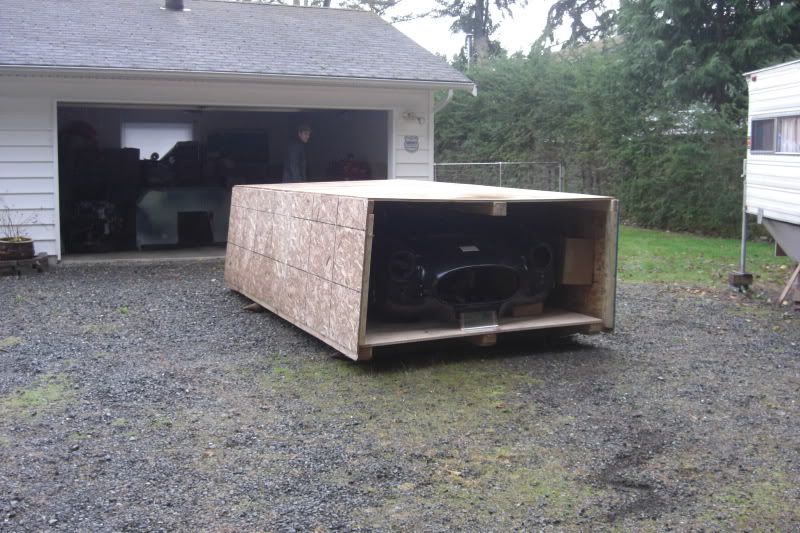
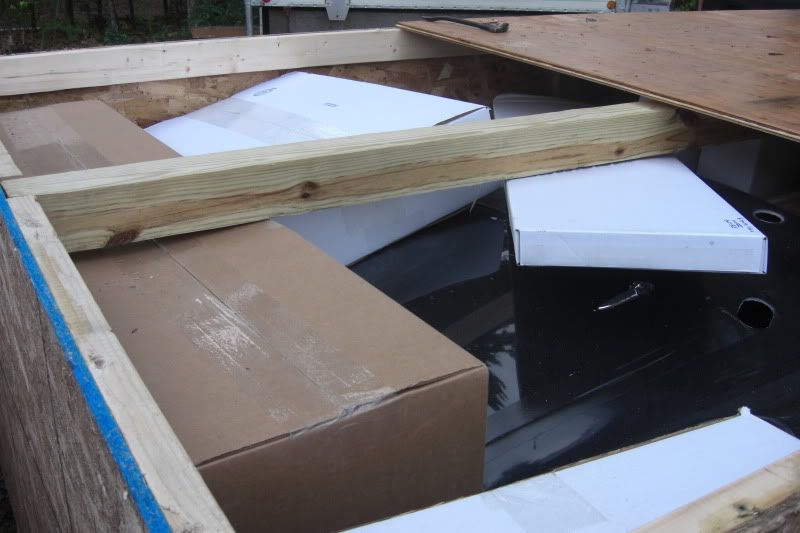
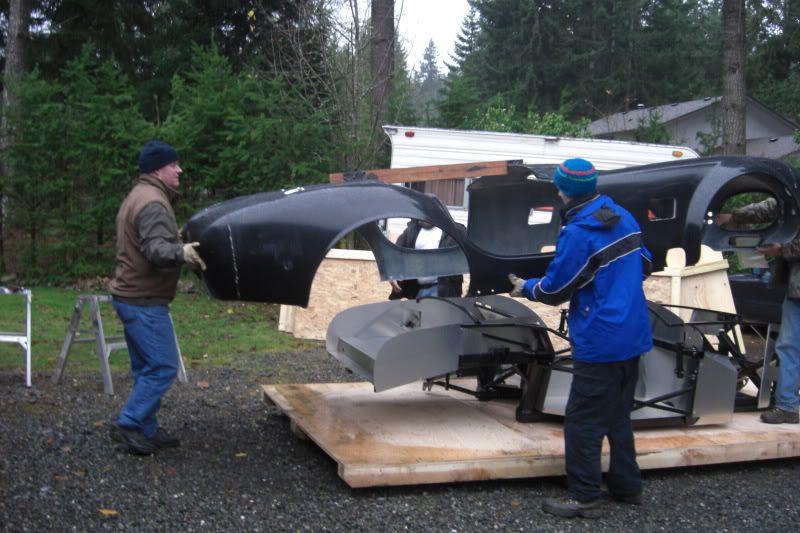
The single large crate, was carefully maneuvered up my driveway, to be dropped directly outside my shop doors. What a bonus! It made for ease of unpacking the crate, and getting all the boxes of parts into the shop. NOTE; Make sure you have lots of room in your shop cleared, before the arrival!
CIMG3021.jpg

Home at last!

It should be noted that your crate will not always arrive at your doorstep in the above fashion. I was extremely lucky that the shipping arrangments made by Western Canada Cobras just happen to use a trucking company that had one of these type of trucks. It is very common for some buyers to have their kit arrive at a local frieght warehouse, and then it is up to you to pick it up, or arrange for delivery of it from that point. Buyers in this position usually opt to get a flat deck tow truck to bring it the last few miles home. The benifit of the flat deck is that they can tilt the bed, and slip the crate down slowly onto your driveway. (If you have a big enough door on your shop, sometimes they can slide it right into your shop)
You could also rent, or borrow a car trailer, and load the crate onto it, and bring it home.
NOTE; The shipping arrangments made through WCC, includes complete insurance on the kit while in transit. If you make your own shipping arrangments, or pick it up at the FFR warehouse, you will want to make sure you have the proper insurance coverage on it.

CONTINUED....​

Last edited by AC Bill; 09-29-2011 at 7:11 AM.​
 
Ready to go into the shop
CIMG3073.jpg


So now the crate had to be unpacked. All the parts included in the BASE KIT, (which is the only one available to CND builders at this time, as per the DOT regulations) where somehow stuffed into this crate, along with the frame and body! This includes seats, windshield, lights, etc., etc.. In addition I had ordered several optional items, such as headers, heater, wipers, passenger roll bar, etc.. Amazing how they got it all in there. Call some friends over to help with this unpacking process. Bribe them with pizza and beer. It worked for me! lol
CIMG3074.jpg


After unpacking and storing the parts, (a complete inventory of them to be done a little later), we were left with a body, and frame to move.
CIMG3107.jpg


The body should rest on a stucture that will prevent it from sagging/distorting, while you work on building the car. This is called a body-buck, and the instructions and dimensions, are available from the FFR web site. This could pre-built, to have it all ready and waiting on arrival day. Some actually wait for the kit to arrive, and then use the packing crate material to build the buck the same day. Your choice..(I was lucky, and was given a ready made one from another Island builder).In this picture you can see the body buck, next to the still uncleaned donor engine.
CIMG3068.jpg
 
It takes four guys to lift the frame, onto the sawhorses, which make the fitting of several parts far easier, then lying on a creeper under the car. You can basically build the car, up until the point your ready to drop the engine tranny in, before lowering it. By that time the suspension is done, wheels are on.
CIMG3110.jpg


STARTING THE BUILD

It's recommended that one of the first things you do after the kit is unpacked, is to do a thorough inventory. If there is a part missing/damaged, you simply call FFR and let them know, they will Fed-EX the parts to your door, hassle free. I had a cracked windshield, and rec'd the replacement in short order. Good service.

Each box of parts is marked, and the packing list has a corresponding number, so it's fairly easy to do. Back orders are also shown. I was fortunate, and had no back orders at all, but it can happen.

The manual that comes with the kit, I admit, is not the greatest. It gives you the step by step procedure, but not in great detail. You don't have to be an automotive engineer to build one of these cars, but some basic automotive knowledge is required. There is also a fantastic forum for builders, by builders, (over 7000 of them), where you can get unlimited help with your questions, problems, or to simply bounce ideas off people. There are also a lot of modifications that builders have done themselves, that can make the car even better, and instructions on how to do them. The existence of this forum is one of the main reasons I decided on this particular kit.

You start the build by assembling, and mounting, your front and rear suspension, shocks, differential, and brakes. You have a choice of going with the basic rear end, which is similar to the stock 4 link Mustang set up, a 3 link optional set up, or an optional independent set up. You need to choose one before ordering your kit.

The basic is the least expensive, and uses much of the donor vehicle parts, including shocks and springs. It is a very good set up, especially good for the high HP builds, and straight line racing. The three link is more expensive, and offers you better handling in corners, or on road course racing, likewise with the independent rear, which is the most expensive. The independent apparently has a very nice, softer ride feel, compared to theothers.There is a vendor that offers a expensive custom made 5 link set up, some builders choose to use. It is supposed to be the cats meow, but is not that common, so I haven't much knowledge on how it all works.

I chose the 3 link set up. This works well with the standard 8.8" Mustang rear axles and differential. The 3 link also require you to use optional coil-over shocks. I was lucky in that the rear end that was in the Mustang at the wrecker, was a 87-88 T-Bird turbo-coupe. This offers the advantage of rear disc brakes rather than the Mustangs stock drums. It also had the stock 3.55 gears, that were used in the T-Bird, those years. The lower gears can offer some incredible acceleration even with a bone stock 5.0 motor. A builder could buy a disc brake conversion kit for the stock Mustang rear drum set up. The cars are pretty light though, so the stock drums do work very well as is, and it will save you money. Rear Suspension in place
IMG_2866.jpg

IMG_2864.jpg

You can see that I have used the BBK lower control arms, but the stock Mustang ones will work fine. You can also order the optional tubular ones that FFR makes. The BBK ones have the advantage of polyurethane greasable bushings. (I just got lucky, as the donor car had these already installed).

Front Suspension. The front end consists of using the donor Mustang lower control arm, spindle, rotors, and calipers. The upper control arm, and ball joints are special, as well the bracket the spindle attach's to. These are included in the Base kit. You can order an optional tubular lower control arm from FFR, if desired.

There is some minor modification required on the stock front lower Mustang arms. This is accomplished with a Dremel, cut off wheel, or an angle grinder. The manual covers this required mod very well. As you can see I am using the Koni coil-overs. You can buy other makes, but these optional Koni's are designed specifically for the FFR roadster. I also chose to install Energy Suspensions poly bushings, and new lower ball joints on the Mustang lower control arms.
IMG_2865.jpg
 
OK something is really weird here. When I try to copy and paste the next segment, a little box pops up, telling me I must paste inside of it, because of browser settings, or some such thing. I go ahead and do that, then hit post reply. I can see the post just fine, but if I leave that page, and then come back to it, it's gone, pictures and all. This little box has popped up on me in the past, and I always presumed all was well as I could see the post I had just made, but now I'm thinking that like the Fender Envy thread, they may not be visible afterwards for some reason?

Another thing..Is there any way to extend the number of pictures to a post to five, instead of just four?
MC allowed five per post, so my entire build thread is broken into five pictures per post. To copy and paste the entire build info over here, is going to be awkward, as I have to cut off each section after four pics, and then pick up where I left off at the beginning of the next post, rather than being able to copy the entire post,as it was.

Edit-- So I logged off the forum, and logged back on, and now I can see the second segment I posted again (regarding suspension). Can everyone else see this, and the pictures?
 
Last edited:
Hi Bill, thanks for starting the build thread, I am sure many will enjoy the read.
I did a couple of years ago and will again. :)

The pop happens to me also, not sure why, I will ask.
I will see Mike tomorrow, will see how big a deal it is to up pics to five per thread.
give me a day or two, should be good.

I look forward to more :)
 
AC Bill, thanks for posting the first sections of your build. I have dreamed of doing that for years, I admire your resolve to get it done. I hope you can post more.

I get that box come up some times too. Its a bit of a pain, more key strokes. It seems to happy after the first couple of normal pastes.
 
This is a great build story, I'll be reading it again. Nice to have some one tell a real story, not just the "all went perfect" parts!
I admire your dedication. I knew the time would be an issue for me so I quickly shelved my 5.0 Miata idea and bought newer, less mods required car.
 
Last edited:
Steering Rack
You can choose to use the donor power steering rack, and keep it powered, or it can be de-powered. Optionally you could buy an aftermarket manual rack, such as the ones offered by Flaming River. I liked the 15-1 ratio for quick steering for autocross, so I bought a slightly used Flaming River manual one. The stock Mustang power rack is very popular amongst builders especially if they have the big mother tires on thier car. The de-powered one is not a popular choice, very heavy steering apparently. The rack install is fairly simple, new bolts and washers are supplied in the FFR kit for it.
The custom steering column is also supplied in the kit. You should confirm with FFR when ordering your kit, what steering rack you are going to use, so you get the correct column to rack, adapter. (This replaces the rag joint you are probably more familiar with).
This picture shows the rack mounted in place, in front of the frame X member. Part of the steering column is also visible.
fanshroud.jpg


Gas Tank install
Using, and installing the donor fuel tank is fairly straight forward. I cleaned my used tank, and straps, and painted them with POR-15, which is really good paint for anything under the car. (I painted my control arms, and rear differential with it as well). You should now decide where you want yourfuel filter, and using the original Mustang bracket, put this in position as well.

Brake and Fuel lines
You now need to install the brake and fuel lines. This also means bending them to fit, so you need to buy a tube bender. I used the preflared armoured lines for both applications. Some use the new style Teflon coated ones, which are supposed to be very easy to bend. Others go with the standard steel lines. Personal choice here.
The manual explains what line size to use for the fuel system, as the return line is different then the feed line. (EFI build) Brake lines and fittings are standard sizes.
First I used some lengths of galvanized fencing wire, to orient where the lines would go, and where I would need to bend them. Then I simply bent the lines to the same shape. It worked very well, and luckily didn't have to discard any screw ups and start over. Bonus! lol Take your time doing this job. The manual guides you as to where to orient them on the frame.
Tight bends such as the pig tail bends by the Master cylinder, can be done using two large sockets clamped in a vice. Carefully bend the lines around, and between the sockets.
Rear brake and fuel lines. You can also see the fuel filter in place, mounted on the frame, just forward of the fuel tank. Not the greatest picture, sorry.
100_0917.jpg

This pic shows the donor charcoal cannister/bracket mounted above the fuel tank. It is used strictly as an odor filter, off the tank vent, and not hooked up to the intake manifold as it would on the Mustang.
100_0965.jpg
 
Here's a question for you.
If you edit a post, and later you want to edit it again, the "edit" choice appears to be missing? Does this mean you can only edit something once per post?
 
I suppose I should mention the aluminum, which is a large part of the build. The aluminum that comes with the kit, is used for all the chassis panels, including the dash, floor, firewall, footbox's, cockpit and trunk floor, rear cockpit bulkhead, etc, etc. These panels also add to the rigidity of the vehicle overall. They come precut, and many of the larger pieces are mounted to the frame when the kit arrives. (The attached ones have to be removed, while doing other parts of the build).

The builders job is to ensure the final fit, and placement of each and every panel, then drill hundreds of holes to accept rivets, for when they are to be mounted to the frame. Rivets are included with the kit, approx 1500 of them! It's actually easy work, and is a great time killer while you are waiting for a part that you ordered, or for paint to dry on something before you can begin installation. The panels can be painted, anodized, powder coated, or left plain. Some even polish them to a mirror like finish, which looks impressive, but must be hell to maintain.
Drivers footbox aluminum.
CIMG3101.jpg

Here you can see some of the other aluminum panels, in the trunk, and floor areas.
CIMG3109.jpg

I have opted to leave my aluminum plain, in tribute to the original Cobras. My ultimate goal is to have an "old school" race car look, not a show car. The originals weren't pretty cars up close, just functional, very high performance sports cars. One famous road test done back in the early sixties, had a 427 Cobra do 0-100mph-0 in 11.8 seconds. Thats MPH not Kms.. Fastest speed in a competition car 198MPH. Street production cars could easily run 150-160 MPH. Even the early 289 powered street version could run 130+MPH. It's a historical car worth paying a tribute to.
 
TOOLS
There are a few tools that one will need, that you may not now have in your tool box. The tube bender for the brake lines, cleco pliers, and severalcleco's in 1/8" and 3/16" sizes. These are for holding aluminum panels, line and wire harness mounting clips etc. temporarily in place.
Torque wrench's for suspension and several other things. An in/lb one, and a ft/lb one. The in/lb is used for checking some things like bearing end play, and smaller bolts. The ft/lb one should have readings from 15 to 150ft/lb
Special tools can cost a lot to buy so the Canadian Tire tool rental program is great. Basically it's free, but you pay the full price for the tool initially, then get a full credit back when you return it. Brake tools, pullers, etc., may be required at some point in your build.
Drilling all the aluminum panels, and frame for the rivets, uses up a few HSS 1/8", and 3/16" drill bits. Get some good quality ones as they will last longer. Split point tips are best. One of those spring loaded centre punch tools is really great in stopping the bit from wandering when starting the hole.
I bought a compressor 8 gallon size, which has been fine so far, although it tends to run quite a bit when using the 3/8 air ratchet. I also use it for the pneumatic riveter, which is a great tool for installing those hundreds of rivets. A hand riveter is also needed for some tight spots. Get one that the head can rotate.
A large bench vise will come in handy, as will a bench grinder, with the dual wheels, one for a wire wheel. Great for cleaning rust off the small donor parts, prior to painting. A dremel tool, an angle grinder, with cutting and grinding disc's, will be really useful. I was lucky in that I was loaned a smallwire feed welder (MIG). There is not a lot of welding needed fortunately, as I can't weld worth a pinch, but it is handy.You could get a friend, or pay a pro welder, for the few things you may need done.
Several wire wheels for your drill are good for cleaning larger parts, prior to painting. The rear end, front and rear control arms, and the engine blockfor instance. Several small parts cleaner brush's are needed as well, get some made of steel, or bronze, as well as the plastic bristle type.
Hole drill bits, the spade type used for drilling wood works good on the aluminum, for wire thru holes, etc, or you can get a bi-metal hole set.
A box of disposable latex gloves will save you some hand cleaner, which is also good to have on hand..

Paints and chemicals
As I mentioned previously the POR-15 paint is great stuff. You can use those disposable sponge brush's when using this, as paint thinner won't work to clean up. Wear gloves!

You may also need brake caliper paint, engine paint, header paint. If you want to paint your valve covers and intake plenum, get a "clear" engine paint to top coat them. This will help them from staining from oil spills etc.
You will also need lacquer thinner, or acetone, several spray cans of parts cleaner. I found the Mopar stuff the best, as it doesn't leave any oily residue, so no problems with fish eyes when painting old parts. It really blasts the crap off, but you can empty a can in seconds, so buy several! You could paint the tranny if your fussy, but as it's aluminum, it actually cleans up pretty good. Aluminum colored heat paint is best for this.
You will need chassis grease, and brake grease. Never-seize. Solvents to help loosen rusty bolts/nuts such as PB Blaster, or Release All, both good products. WD40, or similar spray type lubes. RTV sealants, in blue, black, (or copper), and red, Thread-lock in red and blue. Several tubes of silicone, either clear or aluminum colored, (if you can find it) This is used behind all aluminum panels to be mounted, as well as to fill small gaps here and there on the aluminum panels where they meet. Get a caulking gun for it, if you don't have one, as there is quite a bit of this stuff used.
BUILD CONTINUES
So at this point I had the suspension, rear end, brakes, steering, fuel tank/filter/charcoal cannister, brake and fuel lines installed on the frame.
This is all pretty straight forward, and should move along smoothly. In my case I had a hold up, as when I drained the old rear end fluid, I found pieces of the track lok plates in it. I basically had to rebuild the rear end. New bearings, seals, track-lok plates, shims, etc. You can buy a kit for this stuff, rather than individually. When I complained to the auto wrecker about the bad rear end, he compensated me with some other goodies that I needed, from his yard. It worked out OK. You have to expect that some of the used stuff needs some work, but this was about $300 worth that I hadn't expected.

At this point you should mount the pedal box, and master cylinder. The old pedal box, I cleaned and painted, took apart and lubed. I also put new pedal bushings in, although the old ones would probably have been OK. There is a modification needed to the Mustang brake pedal arm, which requires cuttting it, and welding it back togeather. I had a pro welder do this for $20, and felt it was well worth it, heck it is a brake pedal..You use the Mustang gas, and clutch pedal as well. There is an aftermarket gas pedal available, for this car, which apparently makes the pedal much smoother for acceleration than the stock one. Some have complained the Mustang one has an on/off feel to it, which can be tricky to drive. It must have something to do with the new accelerator cable that comes with the kit. You use the donor clutch cable if it is in good shape.
Many builders like the aftermarket firewall clutch cable adjuster, and quadrant, and remove the stock nylon auto adjuster from the pedalbox. You can also remove the clutch starter safety switch, if you decide to use only the tranny neutral safety switch. You better have one or the other though! The reason some of this stuff is deleted, is because this area can get very crowded, once the fuse box, and wiring is all in place.

Many use the stock power brake booster, and M/cylinder set up from the Mustang. You can also go non-power brake. A Jeep M/cylinder with a larger bore is popular, as it displaces more fluid so feels better than the de-powered Mustang one. A Wilwood m/cylinder is also popular, but can be expensive. MasterCylinder

Once the pedal box and master cylinder is in place, you can go ahead and bleed your brakes, I bench bleed the m/cylinder first, and used Russell speed bleeders instead of the stock bleeders on all four calipers. You can see in the earlier pictures, that I also used the Russell stainless steel flex brake hoses. Apparently this gives a much more solid feel to the pedal than the stock rubber hoses. (As well my donor flex hoses were already 19 years old..) I also used an aftermarket adjustable brake m/cylinder rod, rather than the stock Mustang one. This allows you to adjust the brake pedal height, from the floor more to your personal taste.

You may also want to tweak (bend) the clutch and brake pedal arms, to give you better pedal spacing. You need to put the seat in place on the cockpit floor to do this, and sit in the seat to see how it feels. You want to be able to step on the brake without pushing on the accellerator pedal at the same time. Likewise with the clutch pedal, and not having the brake pedal in the way. It depends a lot on your shoe size. Wider feet will have more of a challenge, in this already narrow space. The common method for pedal spacing is to "dog leg" the pedal arms slightly, putting the clutch and brake pedal slightly more to the left. You can do this in a vise, or as I did, take loan of the "pedal bender" tool. This tool is available for loan to all builders. There is a few in Eastern Canada, and a few in Western Canada, and is accessed through the FFR builders web site. Simply post that you need it, and someone will ship it to you. When your finished you send it on to the next builder who needs it. This tool allows you to tweak the pedal arms, while still in the vehicle. The advantage is that you can sit in the seat, tweak the pedals, see how it feels, maybe tweak some more, till you get them just right.

This can also lead you to another modification in this area that was actually builder inspired. This is called the "footbox dead pedal extension". This extension in the aluminum footbox panel, to the left of your left foot. allows you to space the pedals better, and have a foot rest area, for those long cruises. It's fairly simple to make.
This picture shows the panel extension in place. I have a dead pedal that will be mounted in this area later as a foot rest.
100_0868.jpg
 
AC Bill;n1951 said:
Here's a question for you.
If you edit a post, and later you want to edit it again, the "edit" choice appears to be missing? Does this mean you can only edit something once per post?

I don't know, but I can ask or look.
 
I love the stacks on an engine. Must be my old school upbringing, but they have always been a favorite of mine.
Nowadays you can get them with a fuel injected set up, rather than with having multi carbs. Probably equally as challenging to set up initially, but I bet it doesn't take near the constant fine tuning that having multiple carbs would.
 
Since some days I'm working on stuff on the front end, and other days stuff on the back, the order of the build can be shifted.
smile.gif


There is a panhard bar used with the 3-link set up, for lateral locating the rear end. Special brackets, (called traction lock brackets), are attached to the original existing brackets on the axle tubes. These accomodate the mounting of the coil-over shocks and the panhard bar. The upper brackets on the axle tubes can be cut off, or left on, your choice, but they have no use any longer. EDIT- actually they do have a use, I lied..you can see in my previous picture of the rear suspension, that I have used this bracket,(although cut down from original size) to mount my limiting straps to. These limiting straps are useful whn the rear suspension is completely unloaded, (such as frame on jack stands). This can help prevent the full weight of the rear end being supported by the coil-overs, and also keeps it from resting on the panhard bar frame brace. The straps run to a mounting point on the frame, which is actually where the upper coil spring perch is mounted, if building a car using the original Mustang 4 link configuration.

The bushing eyes on the pumpkin can also be cut off, although some buy, or make a special brace, that uses the one on the right side. (The addition of the extra brace, is for those hard launch's, with sticky tires). This brace helps stabilize the banana bracket that is attached to the axle tube, close to the pumpkin, to which the 3rd link is attached. The 3rd link then runs forward from the banana bracket, to a point on the frame. This third link is also used for setting pinion angle. Both the panhard and the 3rd link are equipped with heim joints, and are fully adjustable to suit your set up. There is also optional locating holes in the frame, and the traction lock brackets, for setting the angle of your lower control arms and 3rd link. This allows for better traction, or better handling, again depending on your particular build preferences.
Here are a few pictures that another builder, Eric, documented of the traction lock braces, and banana brace, etc. These are not my car, but it's essentially the same. I have added the extra upper brace on my banana bracket, just in case I feel the urge to "let her rip" from a dead stop..lol You can see he has left his pumpkin bushing eyes on, but are empty.
Left hand traction lock bracket, and panhard bar mount.
DSCF1996.jpg

Right hand traction lock bracket and panhard bar mounting
DSCF1998.jpg

Banana brace on axle tube, next to pumpkin, 3rd link is just visible near the top of the banana brace
DSC01298.jpg


Factory Five Racing now offers what they call a Base Kit, or a Complete Kit. The Complete kit contains way to many parts to import into Canada, because of DOT regulations. It would be classed as a Kit Car. (even though it's not yet built, wierd as that is)
The base kit is considered nothing more than parts, so it is allowed. As I mentioned previously even the base kit has some parts deleted, so it will qualify for importing to Canada. The MKIII 3.1 model is what I have, which has the latest refinements, and several major improvements over the earlier models offered. Now that may be considered a "deluxe" model, but I have never heard it put that way.
.EDIT- The MKIII 3.1, that I built, is no longer available from the factory, it has been replaced with the MKIV.
 
WIRE HARNESS

You need really good wiring schematics, if you intend on using the original Mustang harness. I found that the factory shop manual was not even good enough. Most builders that opt to use the donor harness, will diet it, as it's called. This means stripping out all the additional wiring that was needed for the Mustang, that is no longer required for the Cobra. Things like the ABS, SRS, warning chimes, dome and courtesy lights, speakers, power antenna, etc. etc. In all approx 23 pounds of wiring can be stripped out. You do need to do this job with the utmost caution. You don't want to remove some important wire, that you may need later.

There is the front end wire harness, the main chassis harness that runs from the rear, the engine harness, dash harness, tranny harness, and the computer harness. It's quite a feat just stripping it all out of the donor car. Dash has to be pulled, seats removed, interior trim stripped out. The wrecker kindly offered to let me do the job of stripping it all out. Now I know why!

Your other choices are to buy a wire harness kit from FFR, Painless, or the Ron Frances wiring harness. Expect to spend close to $1000 US for these. The other choice, which I eventually chose, after major frustrations, is to buy a pre-dieted harness. This is the original harness's from a Mustang that another fellow (Chucks Roadster Electrics) does a very professional job on. It comes well marked, fuse box has been cleaned up, and it's ready to mount to the chassis. All the wires are labeled as to what they are for, and a set of instructions is supplied. For approx $300 CND. in my mind, and on my budget, it's the way to go.

You basically start by draping the dieted harness over the frame of the car, putting things roughly in the correct place. The Ford connectors are pretty specific, so it's actually hard to get them mixed up. You then slowly attach the harness to the frame. In my case, I started from the back, and worked forward. Gas tank sender, and pump, taillights, back up lights, license plate lights, then forward through the transmission tunnel toward the front. The rear harness attach's to another harness up in the dash area, as does the tranny harness, which is a small one, simply for reverse lights, neutral safety switch, and the VSS (speedo drive). The engine harness you can install on the engine. It has already had the modifications done to it for the EGR delete, and the connectors for the TAB and TAD removed. The O2 sensor connections are still used, and in place ready to be plugged in.

Factory Five includes all the wire harness attachments, that you can rivet, or screw on to the frame, and they do a nice job of supporting it. I needed a few larger ones for where the wires are bundled, then what they supplied, but these can be picked up at most parts stores.
 
Back
Top