You are using an out of date browser. It may not display this or other websites correctly.
You should upgrade or use an alternative browser.
You should upgrade or use an alternative browser.
Turning a Fox into a Snake
- Thread starter AC Bill
- Start date
")
thundr
Well-known member
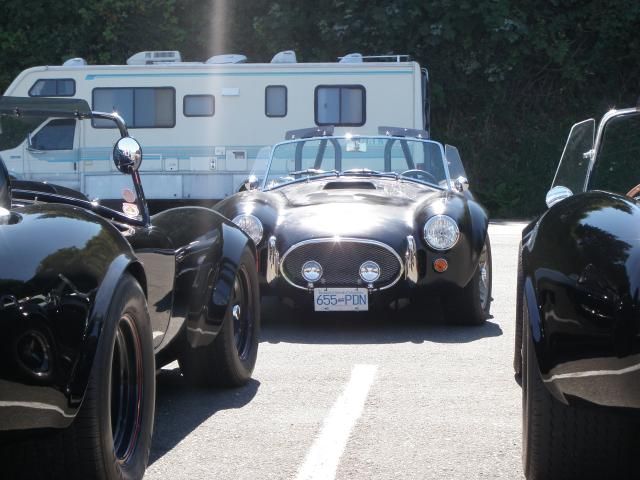
AC Bill, your story still amazes me, lots of details to take care of. I thought of you today when I ran across this Cobra ad today.
http://www.kijiji.ca/v-classic-cars...rs/1177674457?enableSearchNavigationFlag=true
http://www.kijiji.ca/v-classic-cars...rs/1177674457?enableSearchNavigationFlag=true
AC Bill
Well-known member
I have to say that I am really glad I built the car when I did, but regret that I didn't build one sooner.
Though I suppose, when I look at the improvements done in the design of the chassis, for safety, handling, and making them easier to build, my timing was pretty good. FFR is always looking at ways to improve their product, which is why they are probably the most successful of all the companies that have done Cobra replica's.
Sure there is the Kikham's, but they are out of many peoples league, price wise. Superformance makes a great product as well, but again, you pay for it. And unlike almost all the other replica's, the FFR product is still one of the very few that can be legally imported into Canada.
AC Bill
Well-known member
The Story Continues...
The weather hasn't been very co-operative for several weeks, but we finally got a nice sunny day last weekend, so I decided to bundle up and take the Cobra for a little cruise.
I noticed right away that there was quite a bit of gravel on some roads, from when it was spread during our freezing weather. I was really worried about getting a windshield taken out. It's not like you can drive in to a glass shop and get it replaced lickity split, with these cars. Fortunately, the worst of it had migrated to the center of the road from traffic, but even still, I sure didn't dare tailgate anyone..
I also found that there were also several spots the roads that remained damp/wet. I guess the low angle of the sun at this time of the year never hit those spots to dry them. I found from a little experimenting, that you have to respect these wet spots. Just a bit of acceleration, even in third gear, can get the rear end wagging pretty quick! I tended to take the corners pretty gently in the damp areas as well. No high g force corners on this trip..lol
The heater really helped out in staying reasonably comfortable, but since I don't have any door seals in place yet there was a few cold drafts. The wind wings, and sun visors sure help to deflect the wind, and I am sure glad I had them. Overall the driving experience was pretty good.
It was the first time I have driven the car in colder temps, so I was very interested in seeing how it would run. The coolant temp stayed very low at around 185* when in traffic, hovered around 180* when cruising. The engine sounded good, and never missed a beat.
I wondered though, that since the stock 5.0 OEM thermostats are set at 192*, I worried if it may be running a tad rich. I have heard that the computer will set it to run rich until it gets to the preferred higher temp's.
I never noticed anything out of the ordinary, so perhaps I was reaching acceptable engine temps, although perhaps not the "ideal" temp.
What would be the obvious signs, if this is the case, besides exhaust smell? Would there be any noticeable variances in performance that I should be able to pick up on?
Back to rain the last two days, and more forecast, so I guess I'm grounded again for the time being..
A few Days later..
Woke up to 6" of fresh snow on the ground..crap! Looks like Winter Wonderland around here. There won't be much cruising in the Cobra for awhile longer..
I would love to get a few pictures of it parked in the snow. Not a common site for one of these cars!
I wonder if all the melting snow littering the garage floor afterwards is really worth it though. There is also the chance that it may get stuck..lol With only 4-1/2" clearance, and 6" of snow, that is a real possibility...Think I will pass on the photo op..
AC Bill
Well-known member
[h=2]Back on the Road[/h]
In spite of this crappy spring, we have had a few odd sunny days.
I decided that it was finally time to roll out the Snake for some more seat time. I bought six months worth of insurance, which will keep it on the road, till the weather starts to shift to the bad again. I wanted dry roads, not just clear sky's, as I still haven't finished all the sealing that I need to do, in anticipation of getting paint and body work, so wet roads are a no-no. Some roads need more than a day of clear weather before they dry completely, so I had to play the waiting game.
I had started the car a few times over the winter, once to get the gas stabilizer threw out the fuel system, and perhaps once or twice to keep things oiled up. I love the EFI engine, as it fires right up with no hesitation, unlike my carbed 80 Malibu, which is stubborn as hell starting, after sitting any length of time.
Anyhoo, all looked good, roads dryed up, sky was clear, so I went for a nice cruise up Island away's with the wife riding shotgun. The car ran great, and it sure was nice to get behind the wheel. we saw several motorcycles out and about, and even a few rods were being aired out.
There are some very cool rods tucked away here and there on the Island..amazing really. If you want to check them out sometime, there is a big show and shine at Qualicum Beach every Fathers Day Sunday. 600+ cars show up for it!!
I have had the Roadster out a few more times, and actually had a cruise weekend planned for this coming May 14th 15th weekend. Several other Cobra owners were planning on attending, even some from as far away as the lower Mainland and Washington State. Now it looks like the weather is going to flush those plans..that sucks.. A few of the Island guys may still go for a run on Saturday, as it's showing cloudy with sunny periods. Islanders may spot us in the Parksville, Qualicum Beach, and Port Alberni areas, as that was originally the planned route..I'm keeping my fingers crossed..
A back up plan was to do the June 4th 5th weekend, so we will see if that will
work out if the friggin weather wants to play along..Thats the biggest problem with these cars, they aren't built for crusing in the rain..
BUILD PROGRESS
I have managed to get a few more minor things done on the Roadster. I'll post some pictures of tis stuff later, as I left my camera at a friends house..doh..
I purchased a small AC logo, chrome emblem from an e-bay seller for ten bucks, and decided to add it to the passenger side dash. The dash in this area looked like it was missing something, mainly because I didn't add the customary glove box door. (Because of my heater there is no "practical" room in this area to add a glove box) Simple install. I just marked where the two pins on the back of the emblem would go through the dash, and drilled a couple holes for them. Little tricky getting the self cutting nuts started on the pins, but once started it went smooth from there. I think the dash does look a little better now.. although I may still add a fake glove box door in the future
I decided to mount my side fender vents, to improve the look, although I'm still running around with it unpainted. I used industrial strength Velcro to do this. You can buy these "self adhesive" type Velcro strips, so you stick one part of the Velcro to the inner body, above and below the vent opening, and onepart on the ptop and bottom of the vent itself. This way you can easily remove the vent, when you need the access hole for working on certain parts of the engine. This is a handy access to the exhaust manifold bolts, as well as the windshield mounting bolts. I added a length of safety wire to the vents, and back to the frame, just in case the self adhesive decides to un-stick itself. I have heard of this happening on the rare occasion, usually as a result of excessive header heat. My headers are ceramic coated so hopefully this will help, as well, I am using the industrial Velcor, not the cheap stuff one might buy for around the home. If it does come unstuck, at least I won't have the vent drop out and under the car, to be promptly run over by a logging truck..lol
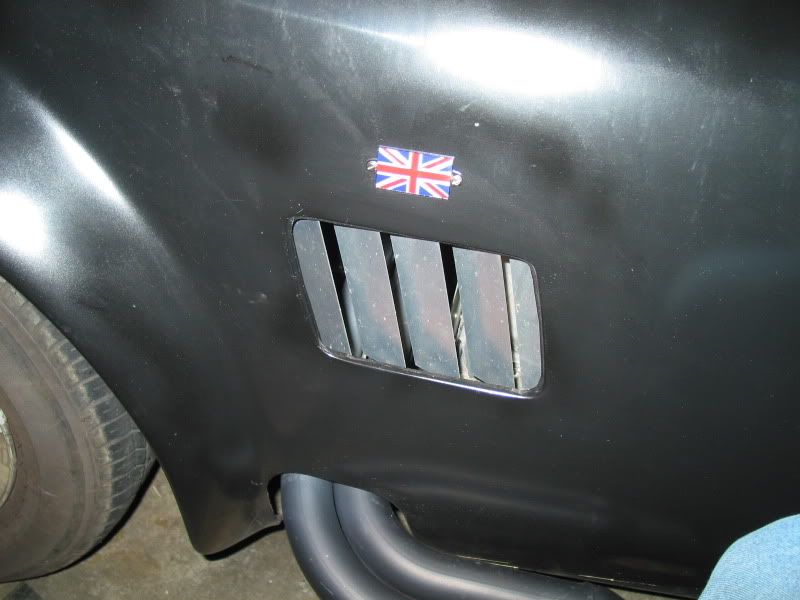
I also decide to mount my British Union Jack emblems, to the area just above the fender side vents. Most Cobra's have either a "Powered By Ford", or perhaps a emblem showing that, and the engines cubic inches, such as "427", etc.
Many replica builders stick these 427 emblems on, as that was the one used on some of the original Cobra's, but of course are plagued everywhere they go by onlookers asking if they are running the 427 engine.,They then sheepishly have to reply, (if they want to be honest) "No, its a small block", or whatever, Course if you have the real deal..why not go with that emblem..
In my case I didn't want to try and fool anyone, as well I wanted to honor the AC Cars, and British history of these cars.
My emblems are nice little porcelain on steel, that each use two small machine screws and nuts to hold them to the body. After lining them up, and drilling the holes, I realized the screws they came with, were not long enough. Crap..I didn't have any others on hand that would be small enough, or made of stainless steel, so I ended up using small stainless, self tapping screws. They are on good and solid, but I think that after the body is painted I will try and find some proper machine screw/nuts, that will work for permanent mounting.
I recently saw where a fellow had added a small metal "Smiths" heater plate to his heater case. This was pretty cool ,as it lent an authentic era correct look to it. (Any heaters installed in the original Cobras, and some other electrics, such as gauges, were made my Smiths) Anyways, I complimented him on it, and was rewarded by him sending me one for my car. Originally these were riveted on the heater housing, which I suspect was metal back in the day.
Of course my modern heater, made by Vintage Air, although looking like an old school heater, has a plastic housing. I was also a little nervous about having rivet tails, perhaps being hit by the squirrel cage fan, and busting the fan..hmmm??
I decided to stick the Smiths info plate on, using some 3M two sided tape, and faking the rivets, to give it "the look". To do this, I cut the heads off some 1/8" aluminum rivets, and removed the pins. leaving a small tail. I then put the rivet in the pre-drilled hole on the Smiths plate, and gently compressed it in a vice. This allowed the rivet tail to flatten out at the rear of the plate, to secure the rivet to it, yet no part of the rivet itself would be inserted in the heater case.
The Smiths plate also has small areas for a model number, and type to be, what I guess would have been originally stamped, onto them, Not having any number or letter stamps on hand, I remembered that many manufactures back in the day, used to simply scratch the info onto model or serial number plates etc., especially back in Britain..(You may have seen examples of this on other products) Well I did have a sharp awl on hand.. so what the heck..I simply carefully scratched "AC RDSTR" ( AC Roadster) for the model, and "VA 3SPD" (Vintage Air 3 speed) for the type. I then stuck it on the heater. Although not real obvious, if some one is poking around under the hood, they should spot it.
I also have my "AC Cars" serial number plate to add to the engine compartment, but after doing some research, I felt it was best to wait and have this actually number/letter stamped before mounting it. I am hoping a buddy of mine may have a stamp set, otherwise I may have to pay a trophy shop to do this.
PAINT AND COLOR CHOICES
I alluded back some time early in this build thread, that I was trying to settle on a paint color for the Cobra. I loved the dark metallic greens, as well as was tempted by the lighter silvery blues, that some of the originals were painted. The lighter color was of course more forgiving if the body wasn't 100% perfect in the prepping, as well as maintaining, compared to the darker color.
I wandered over to my neighbors the other day. He is an older guy, who has been into building hot rods for 40 plus years. He had just finished up a nice 37 Ford Coupe, and was preparing it for the final safety inspection so he could throw plates on it. ( NOTE-The safety inspection is different then I had to go through, as his car had been previously registered many years back, and had a VIN number already).
Anyways, he mentioned that he had painting equipment in his shop and that I was welcome to use it, if I wanted to paint my car myself. He has the HVLP (High Velocity Low Pressure), system, with all the proper paint guns, various tips for them etc. He even offered me two gallons of paint free!
What do you think of a Cobra in Canary Yellow?

Not really my cup of tea, but you have to love the free paint aspect..lol I'll have to do further thinking on this..
I also could just use his equipment, and paint it Matte Hot Rod Black for now, till I can afford the final paint work.. Decisions, decisions..
I decided that it was finally time to roll out the Snake for some more seat time. I bought six months worth of insurance, which will keep it on the road, till the weather starts to shift to the bad again. I wanted dry roads, not just clear sky's, as I still haven't finished all the sealing that I need to do, in anticipation of getting paint and body work, so wet roads are a no-no. Some roads need more than a day of clear weather before they dry completely, so I had to play the waiting game.
I had started the car a few times over the winter, once to get the gas stabilizer threw out the fuel system, and perhaps once or twice to keep things oiled up. I love the EFI engine, as it fires right up with no hesitation, unlike my carbed 80 Malibu, which is stubborn as hell starting, after sitting any length of time.
Anyhoo, all looked good, roads dryed up, sky was clear, so I went for a nice cruise up Island away's with the wife riding shotgun. The car ran great, and it sure was nice to get behind the wheel. we saw several motorcycles out and about, and even a few rods were being aired out.
There are some very cool rods tucked away here and there on the Island..amazing really. If you want to check them out sometime, there is a big show and shine at Qualicum Beach every Fathers Day Sunday. 600+ cars show up for it!!
I have had the Roadster out a few more times, and actually had a cruise weekend planned for this coming May 14th 15th weekend. Several other Cobra owners were planning on attending, even some from as far away as the lower Mainland and Washington State. Now it looks like the weather is going to flush those plans..that sucks.. A few of the Island guys may still go for a run on Saturday, as it's showing cloudy with sunny periods. Islanders may spot us in the Parksville, Qualicum Beach, and Port Alberni areas, as that was originally the planned route..I'm keeping my fingers crossed..
A back up plan was to do the June 4th 5th weekend, so we will see if that will
work out if the friggin weather wants to play along..Thats the biggest problem with these cars, they aren't built for crusing in the rain..
BUILD PROGRESS
I have managed to get a few more minor things done on the Roadster. I'll post some pictures of tis stuff later, as I left my camera at a friends house..doh..
I purchased a small AC logo, chrome emblem from an e-bay seller for ten bucks, and decided to add it to the passenger side dash. The dash in this area looked like it was missing something, mainly because I didn't add the customary glove box door. (Because of my heater there is no "practical" room in this area to add a glove box) Simple install. I just marked where the two pins on the back of the emblem would go through the dash, and drilled a couple holes for them. Little tricky getting the self cutting nuts started on the pins, but once started it went smooth from there. I think the dash does look a little better now.. although I may still add a fake glove box door in the future
I decided to mount my side fender vents, to improve the look, although I'm still running around with it unpainted. I used industrial strength Velcro to do this. You can buy these "self adhesive" type Velcro strips, so you stick one part of the Velcro to the inner body, above and below the vent opening, and onepart on the ptop and bottom of the vent itself. This way you can easily remove the vent, when you need the access hole for working on certain parts of the engine. This is a handy access to the exhaust manifold bolts, as well as the windshield mounting bolts. I added a length of safety wire to the vents, and back to the frame, just in case the self adhesive decides to un-stick itself. I have heard of this happening on the rare occasion, usually as a result of excessive header heat. My headers are ceramic coated so hopefully this will help, as well, I am using the industrial Velcor, not the cheap stuff one might buy for around the home. If it does come unstuck, at least I won't have the vent drop out and under the car, to be promptly run over by a logging truck..lol
I also decide to mount my British Union Jack emblems, to the area just above the fender side vents. Most Cobra's have either a "Powered By Ford", or perhaps a emblem showing that, and the engines cubic inches, such as "427", etc.
Many replica builders stick these 427 emblems on, as that was the one used on some of the original Cobra's, but of course are plagued everywhere they go by onlookers asking if they are running the 427 engine.,They then sheepishly have to reply, (if they want to be honest) "No, its a small block", or whatever, Course if you have the real deal..why not go with that emblem..
In my case I didn't want to try and fool anyone, as well I wanted to honor the AC Cars, and British history of these cars.
My emblems are nice little porcelain on steel, that each use two small machine screws and nuts to hold them to the body. After lining them up, and drilling the holes, I realized the screws they came with, were not long enough. Crap..I didn't have any others on hand that would be small enough, or made of stainless steel, so I ended up using small stainless, self tapping screws. They are on good and solid, but I think that after the body is painted I will try and find some proper machine screw/nuts, that will work for permanent mounting.
I recently saw where a fellow had added a small metal "Smiths" heater plate to his heater case. This was pretty cool ,as it lent an authentic era correct look to it. (Any heaters installed in the original Cobras, and some other electrics, such as gauges, were made my Smiths) Anyways, I complimented him on it, and was rewarded by him sending me one for my car. Originally these were riveted on the heater housing, which I suspect was metal back in the day.
Of course my modern heater, made by Vintage Air, although looking like an old school heater, has a plastic housing. I was also a little nervous about having rivet tails, perhaps being hit by the squirrel cage fan, and busting the fan..hmmm??
I decided to stick the Smiths info plate on, using some 3M two sided tape, and faking the rivets, to give it "the look". To do this, I cut the heads off some 1/8" aluminum rivets, and removed the pins. leaving a small tail. I then put the rivet in the pre-drilled hole on the Smiths plate, and gently compressed it in a vice. This allowed the rivet tail to flatten out at the rear of the plate, to secure the rivet to it, yet no part of the rivet itself would be inserted in the heater case.
The Smiths plate also has small areas for a model number, and type to be, what I guess would have been originally stamped, onto them, Not having any number or letter stamps on hand, I remembered that many manufactures back in the day, used to simply scratch the info onto model or serial number plates etc., especially back in Britain..(You may have seen examples of this on other products) Well I did have a sharp awl on hand.. so what the heck..I simply carefully scratched "AC RDSTR" ( AC Roadster) for the model, and "VA 3SPD" (Vintage Air 3 speed) for the type. I then stuck it on the heater. Although not real obvious, if some one is poking around under the hood, they should spot it.
I also have my "AC Cars" serial number plate to add to the engine compartment, but after doing some research, I felt it was best to wait and have this actually number/letter stamped before mounting it. I am hoping a buddy of mine may have a stamp set, otherwise I may have to pay a trophy shop to do this.
PAINT AND COLOR CHOICES
I alluded back some time early in this build thread, that I was trying to settle on a paint color for the Cobra. I loved the dark metallic greens, as well as was tempted by the lighter silvery blues, that some of the originals were painted. The lighter color was of course more forgiving if the body wasn't 100% perfect in the prepping, as well as maintaining, compared to the darker color.
I wandered over to my neighbors the other day. He is an older guy, who has been into building hot rods for 40 plus years. He had just finished up a nice 37 Ford Coupe, and was preparing it for the final safety inspection so he could throw plates on it. ( NOTE-The safety inspection is different then I had to go through, as his car had been previously registered many years back, and had a VIN number already).
Anyways, he mentioned that he had painting equipment in his shop and that I was welcome to use it, if I wanted to paint my car myself. He has the HVLP (High Velocity Low Pressure), system, with all the proper paint guns, various tips for them etc. He even offered me two gallons of paint free!
What do you think of a Cobra in Canary Yellow?
Not really my cup of tea, but you have to love the free paint aspect..lol I'll have to do further thinking on this..
I also could just use his equipment, and paint it Matte Hot Rod Black for now, till I can afford the final paint work.. Decisions, decisions..
AC Bill
Well-known member
[h=2]Summer 2011 Update[/h]
Looks like summer is officially over around this neck of the woods..Friggin rains have returned in abundance.

I managed to clock approx 1300 miles on the Cobra this summer, so I felt it was time for an update/assessment.
The car has performed flawlessly, thankfully. No issues at all running in the heat of summer. The foot box cooling blower idea really worked well at keeping the heat down. Worth all the time and effort that went into doing that modification. Engine temps, even on the hottest days, and sitting in traffic were remaining spot on. I never did need to use the manual over-ride dash switch, as the adjustable fan switch performed flawlessly. I did notice that the fan would kick on-off a few times after shutting the car down. I know that coolant temps will increase once circulation has stopped, and I imagine the T stat is still open, so the fan sensor in the rad must be picking up on this.
As I gained a better feel for the Cobra, I was able to "test it out" a bit more. Amazing cornering ability, even with my narrower Yokohama's. I never pushed it fully to the limit mind you,
as I never had it actually sliding around a corner..lol I think I will leave that till I can drive it on a closed course, or autocross event.
.Straight line launch's became increasingly fun. Amazing how quickly one can easily reach the, errh, posted speed limit, on Vancouver Islands, new Island Hwy (110kph). I find your out of first gear in a millisecond it seems, second gear gives you a little longer, and in third, you have to start backing off before the engine even hits 4000 rpm. That 3.55 rear gearing really pulls nice. A few passengers I had for ride along's, were laughing their heads off from the shear thrill of the acceleration. It puts a smile on my face too.

I didn't have any issues with aerodynamics as some builders have mentioned, but you can start to feel a slight lightness in the front end, on really windy days, at the, ahh errh, lets say higher speeds.. I am going to look at making an air dam. Nothing ridiculous, just a small lip type one, to mount to the front lower body.
I found the ride extremely comfortable, in spite the stiffer spring rates. The seats are great at absorbing some of the shock. I do find that after cruising for an hour or so, I need to get out and stretch my legs a bit. The dead pedal extension modification really helps for the left leg, but the right leg gets slightly cramped. God only knows how the drivers could take the long stints behind the wheel of the Cobra's, at LeMans, or Sebring. I suspect they were not almost 6'3" tall though..
The only complaint I have is the height of the throttle pedal, vs the brake pedal. When stopped on a hill, you cannot use the heel/toe method for starting off. My throttle pedal is to high to reach it, when my foot is depressing the brake pedal. There is really no adjustment I can do to the brake pedal arm to change this, so I will have to figure out a way to adjust the throttle pedal. This can get tricky, as I don't want to limit the cable to the throttle body so that I can't hit WOT (wide open throttle), before the pedal hits the floor. On the other hand, I also want to make sure the cable allows the TB to go fully back to an idle position, when the pedal is released.
The other issue I want to avoid is having too short a throw on the pedal, as this can make it very touchy. You don't want only 1" of travel between idle to WOT...
Unfortunately I didn't take many pictures of the car to post, but here's a couple I meant to post sooner.
Union Jack side fender emblems installed
My friend Larry guarding the Cobra, at a show and shine in Coombs this summer
I went to the show initially, intending to just look at the other cars, and as it was a nice day out, figured I would drive up there in the roadster. When I got there, the guy at the gate automatically assumed I was entering the car in the show. When i told him I was not, he pointed to the spectator parking lot. It was just a gravel lot, that had dust rising with every car that drove in or out.I would also not be able to keep an eye on my car from that area hmmm OK how much to enter the show? $15 dollars allowed me a good spot that I could watch the car, and other than foot traffic was not near as dusty. So even though the car has not yet had final body work or paint, it became an entry lol
Classification choice was difficult, and I ended up in the Modified 65 or older class. Lot's of competition in this class.. sheesh! Mine was the only Cobra there, but some of the cars in that same class were really spectacular. Paint jobs worth a years wages, custom cut and chopped rods, etc. etc.
Interestingly enough there were still a lot of people gathering around the car, with plenty of questions. My friend Larry fielded most of them. Since he helped me build the car, he knew most of the answers people threw at him.
I found it amusing how many believed it was a un-restored "original". I'm guessing the rough body, and perhaps the AC emblems, made people think that. One fellow, who had no idea I was the owner, pointed out to me that there was some aluminum "panel beating" evident on the car, while pointing at the fiberglass seams.Another fellow, who was standing thee with his mouth hanging open, I asked if he had ever seen one of these cars before? He said, " Yeah, but never an original one!" I felt bad to have to break it to him that he still hasn't lol
While I was sitting in the shade with a few other rod owners, BS'ing about cars, many of them were really surprised when I told them I only had the 302 small block engine in it. They said it sounded like a big block when I pulled in to the show. Cool! I guess it does sound as good as I thought it did..
As the afternoon wore on,, some very ominous dark clouds were heading our way, and I took the cue from a few other Rodder's that were leaving, to get the heck out of Dodge, before the skies opened up. The dust was bad enough but I'm seriously not into mud..lol Unfortunately, I never did see the show trophy's awarded. I thought I may have been in line for the "First Time Shown" trophy, but I wasn't going to stick around to find out...
I managed to clock approx 1300 miles on the Cobra this summer, so I felt it was time for an update/assessment.
The car has performed flawlessly, thankfully. No issues at all running in the heat of summer. The foot box cooling blower idea really worked well at keeping the heat down. Worth all the time and effort that went into doing that modification. Engine temps, even on the hottest days, and sitting in traffic were remaining spot on. I never did need to use the manual over-ride dash switch, as the adjustable fan switch performed flawlessly. I did notice that the fan would kick on-off a few times after shutting the car down. I know that coolant temps will increase once circulation has stopped, and I imagine the T stat is still open, so the fan sensor in the rad must be picking up on this.
As I gained a better feel for the Cobra, I was able to "test it out" a bit more. Amazing cornering ability, even with my narrower Yokohama's. I never pushed it fully to the limit mind you,
as I never had it actually sliding around a corner..lol I think I will leave that till I can drive it on a closed course, or autocross event.
.Straight line launch's became increasingly fun. Amazing how quickly one can easily reach the, errh, posted speed limit, on Vancouver Islands, new Island Hwy (110kph). I find your out of first gear in a millisecond it seems, second gear gives you a little longer, and in third, you have to start backing off before the engine even hits 4000 rpm. That 3.55 rear gearing really pulls nice. A few passengers I had for ride along's, were laughing their heads off from the shear thrill of the acceleration. It puts a smile on my face too.
I didn't have any issues with aerodynamics as some builders have mentioned, but you can start to feel a slight lightness in the front end, on really windy days, at the, ahh errh, lets say higher speeds.. I am going to look at making an air dam. Nothing ridiculous, just a small lip type one, to mount to the front lower body.
I found the ride extremely comfortable, in spite the stiffer spring rates. The seats are great at absorbing some of the shock. I do find that after cruising for an hour or so, I need to get out and stretch my legs a bit. The dead pedal extension modification really helps for the left leg, but the right leg gets slightly cramped. God only knows how the drivers could take the long stints behind the wheel of the Cobra's, at LeMans, or Sebring. I suspect they were not almost 6'3" tall though..
The only complaint I have is the height of the throttle pedal, vs the brake pedal. When stopped on a hill, you cannot use the heel/toe method for starting off. My throttle pedal is to high to reach it, when my foot is depressing the brake pedal. There is really no adjustment I can do to the brake pedal arm to change this, so I will have to figure out a way to adjust the throttle pedal. This can get tricky, as I don't want to limit the cable to the throttle body so that I can't hit WOT (wide open throttle), before the pedal hits the floor. On the other hand, I also want to make sure the cable allows the TB to go fully back to an idle position, when the pedal is released.
The other issue I want to avoid is having too short a throw on the pedal, as this can make it very touchy. You don't want only 1" of travel between idle to WOT...
Unfortunately I didn't take many pictures of the car to post, but here's a couple I meant to post sooner.
Union Jack side fender emblems installed
My friend Larry guarding the Cobra, at a show and shine in Coombs this summer
I went to the show initially, intending to just look at the other cars, and as it was a nice day out, figured I would drive up there in the roadster. When I got there, the guy at the gate automatically assumed I was entering the car in the show. When i told him I was not, he pointed to the spectator parking lot. It was just a gravel lot, that had dust rising with every car that drove in or out.I would also not be able to keep an eye on my car from that area hmmm OK how much to enter the show? $15 dollars allowed me a good spot that I could watch the car, and other than foot traffic was not near as dusty. So even though the car has not yet had final body work or paint, it became an entry lol
Classification choice was difficult, and I ended up in the Modified 65 or older class. Lot's of competition in this class.. sheesh! Mine was the only Cobra there, but some of the cars in that same class were really spectacular. Paint jobs worth a years wages, custom cut and chopped rods, etc. etc.
Interestingly enough there were still a lot of people gathering around the car, with plenty of questions. My friend Larry fielded most of them. Since he helped me build the car, he knew most of the answers people threw at him.
I found it amusing how many believed it was a un-restored "original". I'm guessing the rough body, and perhaps the AC emblems, made people think that. One fellow, who had no idea I was the owner, pointed out to me that there was some aluminum "panel beating" evident on the car, while pointing at the fiberglass seams.Another fellow, who was standing thee with his mouth hanging open, I asked if he had ever seen one of these cars before? He said, " Yeah, but never an original one!" I felt bad to have to break it to him that he still hasn't lol
While I was sitting in the shade with a few other rod owners, BS'ing about cars, many of them were really surprised when I told them I only had the 302 small block engine in it. They said it sounded like a big block when I pulled in to the show. Cool! I guess it does sound as good as I thought it did..
As the afternoon wore on,, some very ominous dark clouds were heading our way, and I took the cue from a few other Rodder's that were leaving, to get the heck out of Dodge, before the skies opened up. The dust was bad enough but I'm seriously not into mud..lol Unfortunately, I never did see the show trophy's awarded. I thought I may have been in line for the "First Time Shown" trophy, but I wasn't going to stick around to find out...
AC Bill
Well-known member
Fall 2011
Anyhoo..I am at the point now that weather-wise, it looks like there won't be much more opportunity to drive the car, to think about getting it painted.
I went around to a few shops to get estimates for the work.
Some typically ICBC production type shops, gave me the "Bum's Rush". I didn't really expect much different, as they usually don't want any project type cars, taking up valuable collision job space. I was hoping to at least get some price's to compare.
One local shop, that is strictly into custom, and restoration work, seemed interested in doing the work, but his estimate made me wonder if that was really the case. Ouch..$13-13,500 he guestimated..
I decided to ask some other local Rodders where they would recommend me taking it. One of the shops was fairly close by, so I went to check it out. This shop also only does strictly private collision repairs, custom and restoration type work. No ICBC or insurance work welcomed. He showed me a few jobs he had on the go, one nice 69 Chevelle that was basically finished, It had beautiful paint work, door hood, and trunk gaps looked good, no sign of the metal restoration work that went into it. Another car he was in the process of stripping and prepping, I looked over, and I could see that he appeared to know what he was doing.
He is really interested in doing a Cobra, as he felt it would draw a lot of interest and inquiry's that could help his business grow. (He has recently relocated here, from Port Hardy) He basically told me that price wise, it was up to me, depending on what I wanted him to do.
I explained what I expected, discussed color choices, etc., and we eventually settled on a price, we could both live with. I still need to get a contract in writing, listing the work, but I think I may be taking it in to him this October or November. I wanted to have it done and ready for the spring, and he is confident that it will be finished well before then.
Curious if anyone here on the Island, has heard of this fellow, and knows of his work? He calls his shop Rob's Custom Paint Shop.
Lot's of videos on You Tube of work he has done..
hotrodcarguy's Channel - YouTube
AC Bill
Well-known member
Faux Knock-Off Spinner Installation.
I began to fiddle around with the fake knock off spinners I bought from Corvette South. I didn't like the tiny set screws they are supplied with, as a means of securing these to the wheels. I bought some longer and larger diameter ones, which meant a little modifying. I had to drill and re-tap the original holes to suit the new set screws. The material is quite soft so this was actually pretty straight forward.
On the front wheels, the towers as they are called, needed to be attached to the front hub, that protrudes through the wheel center. The tower slides over this small section, and is held in place by tightening the three set screws. It's a bit tricky as the lug nuts are almost in the way, to get an Allan key into the set screw. After the towers are solidly mounted, you spin the three armed spinner on to them, and then tighten another single set screw to secure them. Sure don't want it spinning off at high speeds! Be like a Ninga weapon flying through the air..
I still need to get some center emblems for them. I have seen a set of the AC ones available out of the US, but they aren't cheap. I have a friend and fellow FFR owner that owns a printing shop. He thinks he can make up a set for me.
The rear knock offs, will entail a little more work. On the rear the tower fists inside the wheel center, and butts against the rear axle end. The set screws are than tightened up against the wheel center itself, from the inside. Trouble is the tower has a small flange on it which is supposed to sit flush against the wheel face. Designed for the Corvette wheel originally, the this flange will stick out on my Turbine wheels, because the base of them come up against the axle, before becoming flush wit the wheel.
I need to get some material removed before installation, from the base of the towers. I thought about marking them and using an angle grinder to knock off the excess, This could result in two issues. One, I may not grind them to s nice even level, which would cause the knock offs (while turning) to look off center. The wobble effect in other words. Two, I could have issues with the towers chrome peeling, at the edge of the grind. I am going to investigate having them turned down o a metal lathe, before I can do any more on the rears,
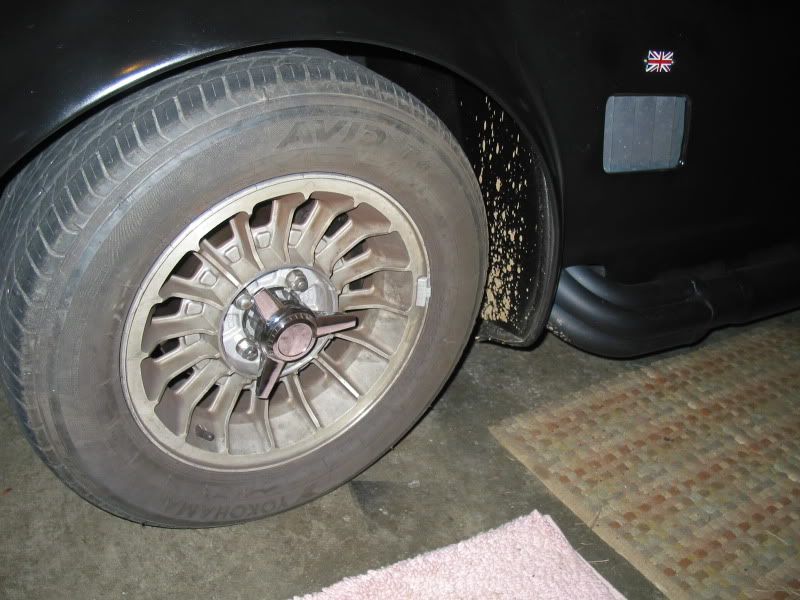
Here's a picture of the front ones installed. I wish I could make a small cover to hide the lug nuts, as they would look way better without them showing. Some of the fake Halibrand wheels have a lug nut cover on them..This may take a bit of ingenuity. I still have the original Turbine plastic center caps. I might be able to incorporate these somehow. IE; drilling out a hole in them for the tower to fit through...we will see..
Front Faux Knock-Off installed.
As the sun has been shining I decided to delay taking the Cobra in to the shop for awhile longer, and do some more cruising.. Can't get enough of it really. To bad I have a long list of other projects to do around the yard, that also need fairer weather to do them. Crap..
I have a neighbor who has a metal lathe, and he made quick work of the spinner towers for the rear wheels. I needed them turned down about 1/8" and was hesitant to grind them down myself. His lathe is a nice tool that I would love to have for any custom type work. No issues with the chrome at all. I now have to drill and tap holes in them, so I can place the larger set screws, that hold the towers to the wheels.
I was still looking at ways to hide the lug nuts, and a fellow I was speaking to the other day came up with a good idea. He suggested having billeted aluminum covers made, that would fit behind the knock off, and line up with the center wheel opening. I can envision what he is talking about, and think that might be the route to go. I'm not sure if this would have to be done on a CNC machine, or if my neighbor would be able to make them on the metal lathe.. Now that might save a few bucks!
Initially will have to track down some large blocks of aluminum, of a suitable size. Not sure where that kind of thing could be found around this neck of the woods..Some research required..
So I took another cruise up to the body shop, where I am thinking of getting the work done at, just to go over some details. I wanted us both to be on the same page, as to what is expected for the price. Unfortunately he will not put any of this in writing..IE a proper estimate.
I wonder if he is starting to fear that there may be more work then he initially realized, Whether he has done some further research on doing a glass car, since I first took the car in, or is second guessing his initial estimate? Or was he low-balling me.. so he could get the car in the door?
I really don't feel comfortable without getting something in writing. What happens if he is halfway done with the car, and then claims he needs more money to finish it? I think he needs to commit, one way or another, and if his estimate is off, that's the risk he takes..
What would you do?
I began to fiddle around with the fake knock off spinners I bought from Corvette South. I didn't like the tiny set screws they are supplied with, as a means of securing these to the wheels. I bought some longer and larger diameter ones, which meant a little modifying. I had to drill and re-tap the original holes to suit the new set screws. The material is quite soft so this was actually pretty straight forward.
On the front wheels, the towers as they are called, needed to be attached to the front hub, that protrudes through the wheel center. The tower slides over this small section, and is held in place by tightening the three set screws. It's a bit tricky as the lug nuts are almost in the way, to get an Allan key into the set screw. After the towers are solidly mounted, you spin the three armed spinner on to them, and then tighten another single set screw to secure them. Sure don't want it spinning off at high speeds! Be like a Ninga weapon flying through the air..
I still need to get some center emblems for them. I have seen a set of the AC ones available out of the US, but they aren't cheap. I have a friend and fellow FFR owner that owns a printing shop. He thinks he can make up a set for me.
The rear knock offs, will entail a little more work. On the rear the tower fists inside the wheel center, and butts against the rear axle end. The set screws are than tightened up against the wheel center itself, from the inside. Trouble is the tower has a small flange on it which is supposed to sit flush against the wheel face. Designed for the Corvette wheel originally, the this flange will stick out on my Turbine wheels, because the base of them come up against the axle, before becoming flush wit the wheel.
I need to get some material removed before installation, from the base of the towers. I thought about marking them and using an angle grinder to knock off the excess, This could result in two issues. One, I may not grind them to s nice even level, which would cause the knock offs (while turning) to look off center. The wobble effect in other words. Two, I could have issues with the towers chrome peeling, at the edge of the grind. I am going to investigate having them turned down o a metal lathe, before I can do any more on the rears,
Here's a picture of the front ones installed. I wish I could make a small cover to hide the lug nuts, as they would look way better without them showing. Some of the fake Halibrand wheels have a lug nut cover on them..This may take a bit of ingenuity. I still have the original Turbine plastic center caps. I might be able to incorporate these somehow. IE; drilling out a hole in them for the tower to fit through...we will see..
Front Faux Knock-Off installed.
As the sun has been shining I decided to delay taking the Cobra in to the shop for awhile longer, and do some more cruising.. Can't get enough of it really. To bad I have a long list of other projects to do around the yard, that also need fairer weather to do them. Crap..
I have a neighbor who has a metal lathe, and he made quick work of the spinner towers for the rear wheels. I needed them turned down about 1/8" and was hesitant to grind them down myself. His lathe is a nice tool that I would love to have for any custom type work. No issues with the chrome at all. I now have to drill and tap holes in them, so I can place the larger set screws, that hold the towers to the wheels.
I was still looking at ways to hide the lug nuts, and a fellow I was speaking to the other day came up with a good idea. He suggested having billeted aluminum covers made, that would fit behind the knock off, and line up with the center wheel opening. I can envision what he is talking about, and think that might be the route to go. I'm not sure if this would have to be done on a CNC machine, or if my neighbor would be able to make them on the metal lathe.. Now that might save a few bucks!
Initially will have to track down some large blocks of aluminum, of a suitable size. Not sure where that kind of thing could be found around this neck of the woods..Some research required..
So I took another cruise up to the body shop, where I am thinking of getting the work done at, just to go over some details. I wanted us both to be on the same page, as to what is expected for the price. Unfortunately he will not put any of this in writing..IE a proper estimate.
I wonder if he is starting to fear that there may be more work then he initially realized, Whether he has done some further research on doing a glass car, since I first took the car in, or is second guessing his initial estimate? Or was he low-balling me.. so he could get the car in the door?
I really don't feel comfortable without getting something in writing. What happens if he is halfway done with the car, and then claims he needs more money to finish it? I think he needs to commit, one way or another, and if his estimate is off, that's the risk he takes..
What would you do?
AC Bill
Well-known member
[h=2]Early Spring 2012[/h]
I'm getting tired of this winter weather..sucks to have the car just sitting there.
As you can see still no progress on paint,, looks like it will be early spring before I can get it out for some more estimates. Either that or begin to work on it myself.
In the meantime, I have been doing some small projects on the car.
My inner trunk lid has an access hole to allow the installation of the license light. It's an odd shape, kind of egg like, so I traced it out on some paper, and will cut a piece of aluminum to fit over the hole. Likely will use self tapping screws to fasten it on, so I can easily remove it. I will need to remove the license lamp later for paint.
I managed to find one of those optional Ford Performance intake plenum plate, that says "Cobra" rather than the standard Ford 5.0 HO that comes on the majority of early 5.0 plenums. It was used, but in fantastic shape, and was pretty cheap ($15), so figured I would go for it... looks good.
I have been resistant to tackle the drivers side wiper wheel box, but I know I should get at it. The one I installed allows the wiper to skip on the cable drive, so it goes all out of sync with the passenger side. A fellow FFR builder sent me a new one, in case I can't get the original one to work. It hasn't really been an issue, as I have not, and am not, planning on driving the car in the rain..ever..but you never know for sure..
I really need to get the throttle pedal height set better, so I can heel toe-drive. During the "last drive of the year" last fall, I came to stop on a hill. Of course some women in a mini-van pulls right up close to my back end, probably wanting to see the car better. Light changes, and to prevent rolling back into her, (or perhaps stalling) I was hard on the gas, (a little too hard), clutch out.
My wife said I must have scared the living hell out of everyone at the intersection, as the tires lit up, the side pipes roared, tire smoke everywhere..sheesh..and here I'm trying not to draw attention to the car..
 .
.
Anyways.. I need to get the pedal as near as possible to the height of the brake pedal when it is fully depressed. This way I can use one foot to hold the brake on, and at the same time bring the engine revs up, just enough, for a more suitable launch..
Other jobs still to do, include drawing up plans for some center wheel covers, to tuck behind the faux knock off spinners, to hide the lug nuts. (I previously mentioned this idea with the picture I posted of the wheel earlier).
I think aluminum that I could paint the same as the wheel would look best. It looks like the plastic OEM center cap would stick out to far for the spinner. I don't think a simple flat round plate of aluminum would look great, but other than styling it up with some drilled holes, I have no idea how I could incorporate a design into them? Maybe, if I had access to a water jet..
One fellow made these center caps to cover the lug nuts, which look pretty good..
Any metal workers out there that can bang me out a set of these? Let me know!
As you can see still no progress on paint,, looks like it will be early spring before I can get it out for some more estimates. Either that or begin to work on it myself.
In the meantime, I have been doing some small projects on the car.
My inner trunk lid has an access hole to allow the installation of the license light. It's an odd shape, kind of egg like, so I traced it out on some paper, and will cut a piece of aluminum to fit over the hole. Likely will use self tapping screws to fasten it on, so I can easily remove it. I will need to remove the license lamp later for paint.
I managed to find one of those optional Ford Performance intake plenum plate, that says "Cobra" rather than the standard Ford 5.0 HO that comes on the majority of early 5.0 plenums. It was used, but in fantastic shape, and was pretty cheap ($15), so figured I would go for it... looks good.
I have been resistant to tackle the drivers side wiper wheel box, but I know I should get at it. The one I installed allows the wiper to skip on the cable drive, so it goes all out of sync with the passenger side. A fellow FFR builder sent me a new one, in case I can't get the original one to work. It hasn't really been an issue, as I have not, and am not, planning on driving the car in the rain..ever..but you never know for sure..
I really need to get the throttle pedal height set better, so I can heel toe-drive. During the "last drive of the year" last fall, I came to stop on a hill. Of course some women in a mini-van pulls right up close to my back end, probably wanting to see the car better. Light changes, and to prevent rolling back into her, (or perhaps stalling) I was hard on the gas, (a little too hard), clutch out.
My wife said I must have scared the living hell out of everyone at the intersection, as the tires lit up, the side pipes roared, tire smoke everywhere..sheesh..and here I'm trying not to draw attention to the car..
Anyways.. I need to get the pedal as near as possible to the height of the brake pedal when it is fully depressed. This way I can use one foot to hold the brake on, and at the same time bring the engine revs up, just enough, for a more suitable launch..
Other jobs still to do, include drawing up plans for some center wheel covers, to tuck behind the faux knock off spinners, to hide the lug nuts. (I previously mentioned this idea with the picture I posted of the wheel earlier).
I think aluminum that I could paint the same as the wheel would look best. It looks like the plastic OEM center cap would stick out to far for the spinner. I don't think a simple flat round plate of aluminum would look great, but other than styling it up with some drilled holes, I have no idea how I could incorporate a design into them? Maybe, if I had access to a water jet..
One fellow made these center caps to cover the lug nuts, which look pretty good..
Any metal workers out there that can bang me out a set of these? Let me know!
AC Bill
Well-known member
Another local "custom" shop, without even looking at the car, quoted me $9-9500 for body and paint. I'm a little mystified how you can give an estimate without seeing the vehicle? He just ball parked the hours I guess..He guessed 30 hours polishing after paint..huh? That seems a little extreme for a car that I will be driving regularly. I wonder if these "custom" car guys, are so used to only working on the classic "trailer queens", they forgot what a basic paint job entails.
He does some awesome work no doubt, as I looked over some ground ups he had done on two GTO's and a Chevelle. So nice are they in fact, I can picture them hardly ever being actually driven..Sad really..
[h=2]Snake on the Beach..[/h]
He does some awesome work no doubt, as I looked over some ground ups he had done on two GTO's and a Chevelle. So nice are they in fact, I can picture them hardly ever being actually driven..Sad really..
[h=2]Snake on the Beach..[/h]
Taking full advantage of the great weather, I have been out cruising almost every day recently.
I am really bad at remembering to snap some photo's, but saw a good opportunity down at Qualicum beach the other day..
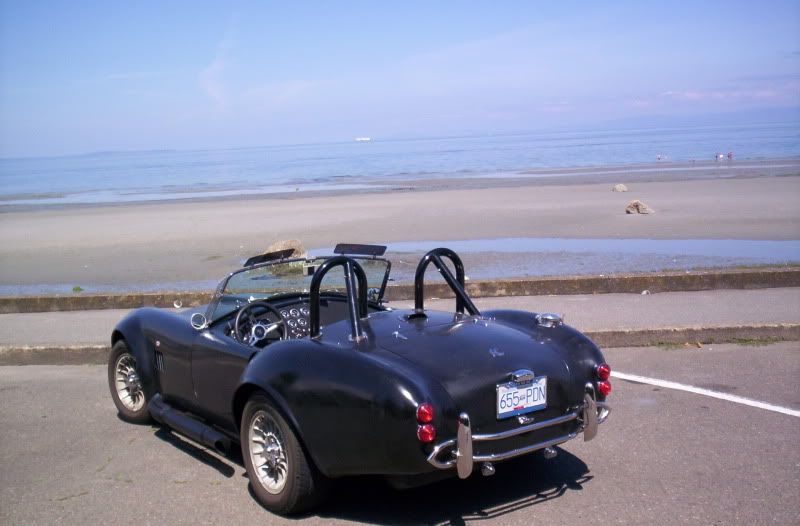
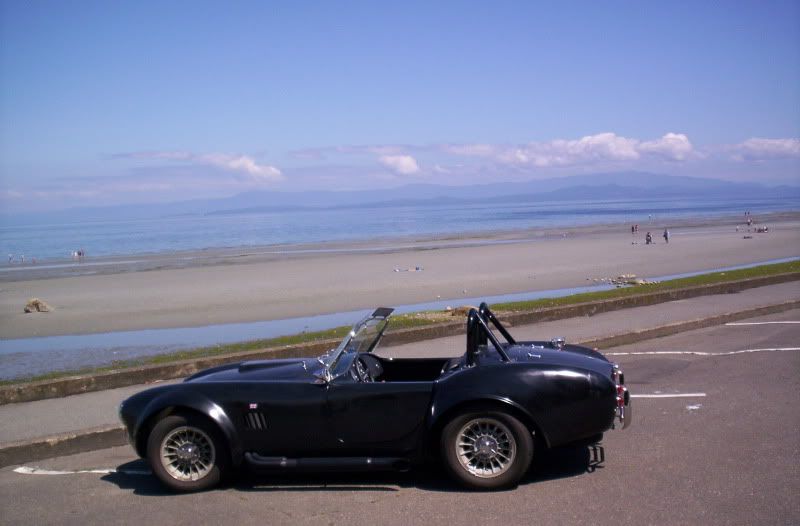
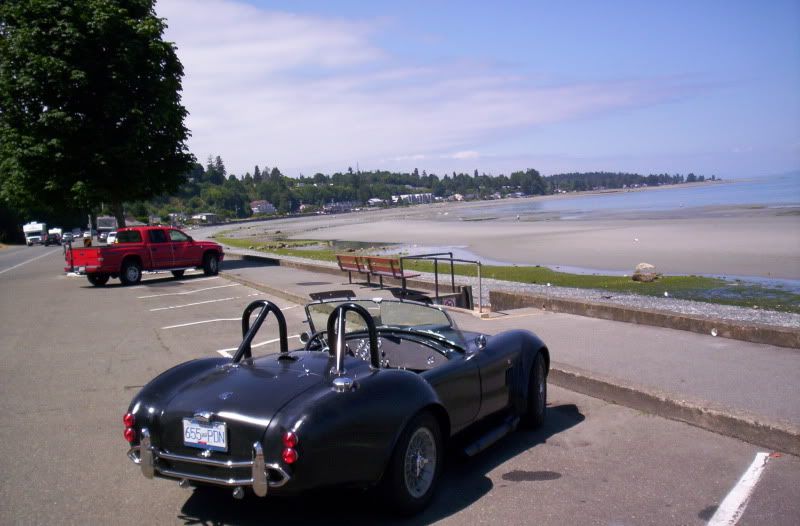
I wish the Cobra was amphibious..now that would be fun..

I am really bad at remembering to snap some photo's, but saw a good opportunity down at Qualicum beach the other day..
I wish the Cobra was amphibious..now that would be fun..
AC Bill
Well-known member
The Cobra's been running great, (knock on wood), and I have enjoyed putting several miles on it this spring and summer, with the great weather we have been getting.
I took the Wife out for the annual Fathers Day Cruise this year. She was amazed at all the people lining the cruise route, waving and yelling encouragements, and compliments. She was waving back at everyone, and getting a real kick out of the whole thing. It was a lot of fun, and some wonderful cars. Some estimates were that as many as 350 made the run that evening.
I haven't a lot to report on the Cobra's progress. I have added a set of driving lights, and done a few minor things.
The driving lights I used were an older looking British style, similar to the mid-sixties Lucas driving/fog lights. I liked them as they looked more original than the modern day Cibie's or other common makes. Heavily chromed cast housing, with a small chrome mounting foot. I struggled with a way to mount them initially, but a buddy of mine that works at a motorcycle dealership came through with a mount that would work. They were designed for clamping driving lights on to highway bars on a motorbike. The diameter was perfect for my front bumper hoop. I added a small strip of rubber to the clamping parts, so not to mar the chrome bumper, but as well to give some added friction, so they wouldn't vibrate out of position.
I had already run wires for them, and already installed a relay and a dash switch, so it was really just a matter of fastening them to the bumper hoop, and running a ground wire.
I though they looked pretty good on the car, somewhat reminiscent of the original competition Cobras. I sure wish a front license plate wasn't required in BC..
I had a problem with my defogger vent outlets, which I am striving to find a solution for.
If you recall, I used a pair of dash vents that I purchased from a local auto wrecker. (See page six of this thread for a full explanation of what I did.) These outlets were out of certain early year Toyota MR2's, and worked like a charm for the first couple years. I liked the fact that they were controllable, as to on/off, and directional, as they were a ball type vent. I guess the sun and the heat, and simply the age of them finally took it's toll, as the fastening rings started to crack on them. These rings are what held them in place on the cowl, and once more cracks began to show up, the rings literally came apart. This allowed the rest of the vent to drop down below the cowl.
Being an open top car, and the fact that I only drive it in the better weather months, it's not been a big concern, but I dislike the gaping holes in the cowl. They just looks ugly. I contacted the company that makes my heater unit, Vintage Air, as they also sell vent bezels for all kinds of set ups. The round ones they have, unfortunately, will not fit directly onto my 2" air duct hoses. I need to purchase additional "adapters" to make them fit. None of them are the exact same size diameter as the Toyota ones, so I also need to make some modifications to make them fit. The ones they sell that are controllable, and directional, have smaller diameter than the holes I have cut. I was thinking I need to make a flat spacer ring of sorts, (perhaps out of aluminum), for the outlets to sit down into. Looks like a good job for the fall..
In the meantime, as the song say's, I just want to "Get Out and Drive"
I took the Wife out for the annual Fathers Day Cruise this year. She was amazed at all the people lining the cruise route, waving and yelling encouragements, and compliments. She was waving back at everyone, and getting a real kick out of the whole thing. It was a lot of fun, and some wonderful cars. Some estimates were that as many as 350 made the run that evening.
I haven't a lot to report on the Cobra's progress. I have added a set of driving lights, and done a few minor things.
The driving lights I used were an older looking British style, similar to the mid-sixties Lucas driving/fog lights. I liked them as they looked more original than the modern day Cibie's or other common makes. Heavily chromed cast housing, with a small chrome mounting foot. I struggled with a way to mount them initially, but a buddy of mine that works at a motorcycle dealership came through with a mount that would work. They were designed for clamping driving lights on to highway bars on a motorbike. The diameter was perfect for my front bumper hoop. I added a small strip of rubber to the clamping parts, so not to mar the chrome bumper, but as well to give some added friction, so they wouldn't vibrate out of position.
I had already run wires for them, and already installed a relay and a dash switch, so it was really just a matter of fastening them to the bumper hoop, and running a ground wire.
I though they looked pretty good on the car, somewhat reminiscent of the original competition Cobras. I sure wish a front license plate wasn't required in BC..

I had a problem with my defogger vent outlets, which I am striving to find a solution for.
If you recall, I used a pair of dash vents that I purchased from a local auto wrecker. (See page six of this thread for a full explanation of what I did.) These outlets were out of certain early year Toyota MR2's, and worked like a charm for the first couple years. I liked the fact that they were controllable, as to on/off, and directional, as they were a ball type vent. I guess the sun and the heat, and simply the age of them finally took it's toll, as the fastening rings started to crack on them. These rings are what held them in place on the cowl, and once more cracks began to show up, the rings literally came apart. This allowed the rest of the vent to drop down below the cowl.
Being an open top car, and the fact that I only drive it in the better weather months, it's not been a big concern, but I dislike the gaping holes in the cowl. They just looks ugly. I contacted the company that makes my heater unit, Vintage Air, as they also sell vent bezels for all kinds of set ups. The round ones they have, unfortunately, will not fit directly onto my 2" air duct hoses. I need to purchase additional "adapters" to make them fit. None of them are the exact same size diameter as the Toyota ones, so I also need to make some modifications to make them fit. The ones they sell that are controllable, and directional, have smaller diameter than the holes I have cut. I was thinking I need to make a flat spacer ring of sorts, (perhaps out of aluminum), for the outlets to sit down into. Looks like a good job for the fall..
In the meantime, as the song say's, I just want to "Get Out and Drive"
AC Bill
Well-known member
2016.
I figure it's finally time I git around to painting the beast. Although I've really enjoyed the worry free aspects of driving it in gel-coat the last several years, I felt that it was finally time, for the next step in it's journey. I finally found a body-man/painter who will take on the challenge!
I had stopped off to see him last summer to discuss the job, and get an estimate. It's a smaller shop, and he tends to do pretty much only private jobs, and no insurance claims. At that time, he hummed and hawed about doing the car, and stated that he wasn't sure if he even wanted to do it. He also wasn't exactly sure what kind of time it would take to do the work, and was hesitant to give me a price. I told him that I had a break down, of what one shop charges to do these cars, item by item, if that would help give him an idea. This price list was put together by one of the foremost Cobra body and repair shops in the US. So I sent him an attachment of it in an e-mail a few day's later. This would have been in late July 2015..I never heard from him.
Out of the blue in early February I get a phone call. "It's Dan from S&S..do you still want your Cobra painted?" He stopped off at my shop and we went over the details together, so we both knew what was expected. He came up with a price that seems fair, so I said I would get it ready to go.
He's local to boot, so I can follow the progress of it. I have to remember to take my camera with me when I stop off for a visit, so I can post some pictures.
I spent the last week stripping off the exterior parts and accessories. Headlights, tail lights, emblems, grille, roll bars, side vents, mirrors, etc.. I thought for the sake of his time and my money, plus my knowledge of how it all comes apart, it would be best if I did this step of the preparation.
I quickly found out that it was easier to put some things together, than it was to take them apart. The tail lights for example, I had mounted when the body was off the chassis. I had lots of room to reach the nuts that hold them, from under the body. Removing them on the chassis, I had to lay on my back, reach way up past the gas tank, (and on the right side the fuel filler hose), and try to fit a 11/32nd socket over the nuts. (Who the hell uses 11/32nd sized nuts anyway? I was lucky I even had a socket to fit them).
I had to do all this by feel. as I can't fit my head under the rear quarter panels because the car sits to low to the ground. I am over 6' tall, and the rear of the car was only a few feet away from the garage door, so to get my arm in the position that could reach up inside the body and reach the nuts, I had to stick my legs and feet up on the garage door. Yes, I could have opened the door and let my legs hang out into the driveway, but wheres the fun in that? Besides it was raining and colder then heck, and that would have sucked all the heat out of the shop as well...In the summer it wouldn't be an issue.
To add insult to almost injury, reaching the nylock's on the underside of the LeMan's gas filler cap meant having to reach even further up inside the body. Then of course all seven of the stainless steel Phillips head machine screws wanted to turn, as I loosened the nuts. Obviously this was a two person job.
Not having another person around to assist, I got the wise idea to put a Phillips screwdriver, in a pair of vice grips, and hope the weight of the vice grips would keep the tip of the screwdriver in the head of the screw. The LeMans cap itself would act as a "stop", so the whole works wouldn't just spin around while I loosened the nuts off. My biggest fear was the screwdriver and vice grips would slip off the screw, off the 1/4 panel, and land right on my face. But...Lady Luck was on my side (for once)..and by gawd it worked!
The roll bar bezels where also a challenge to remove. Again using nylock nuts on the underside of the body, and Phillips machine screw holding the bezel. Thankfully, with the trunk lid proipped fully open, my long arms were able to reach the nuts with a ratchet and socket, while I held the screwdriver with the other hand. Of course standing in that awkward position I couldn't see where the precious nuts and washers went when they finally loosened off. Many of them simply dropped on to the trunk floor, and I was able to recover them, but a few disappeared completely. I felt all around the base of the roll bar legs, and shoulder harness mounts, but no frickin luck. Then I got the bright idea, OH! I can just use my long reach magnet, and fish around back there for them! I realized quite quickly, when I did make contact with one of the washers, that they were all stainless steel, and a magnet wouldn't pick them up..Crap! I then started a list of things I would need to buy prior to reassembling the car.
I dreaded trying to remove the roll bars themselves, as when I had pre-fit them back when I was building the roadster, I had a hell of a time getting the tubes back off the frame mounts. The larger roll bar tubes slip down over a female tube, that's welded to the frame. A special bolt secures them in place. That time it took a lot of persuasion to get them back off the frame. I must have learned my lesson back then though, and had ground the inside of the roll bar tubes, (mainly to get rid of the powder coating over-spray), as they came off quickly, with just a few blows needed from a rubber malllet.
I have studied the procedure for fitting and gaping the doors, and the trunk lid when doing body work. The experts claim that the windshield should be left in place while fitting the doors, as the weight of it resting on the cowl, can change the shape of the body slightly at the tops of the doors where they meet the cowl above the dash. The rear bumper also plays a roll in how it's mounting system can be used to fit the trunk lid to the lower body panel. To get a nice fit and gap across the bottom, the mounts can be adjusted slightly in or out. Both the windshield and the rear bumper will be pulled off after all the fitting is done, so I didn't have to remove them at this stage.
The headlights and front marker lights came out remarkably easy. Likewise with the front bumper. The custom grille I made was a little more awkward, as again I had installed it when the body was off. It's bloody amazing, the weird positions that you can twist your arms and hands into when you really need to. I sustained a few wounds mind you, but at least I didn't need band-aids this time. I managed to stop the bleeds with duct tape, and their already healing nicely!
AC Bill
Well-known member
Snake heads off for a new skin.
So after I had removed all that was needed from the car, the fellow who is going to do the body and paint, arranged with his neighbor, and fellow car junkie, to pick up the Cobra with a car trailer. Bonus!
I was a bit worried, as the Cobra only has 4" of clearance. I had heard of some of the misadventures of these cars being loaded onto flat-decks, etc, and getting high centered. Of course we have all seen the U-Tube videos of cars, and trucks being loaded, and falling off the ramps, or the ramps shooting out from under the car, and the car rolling onto the ground on it's side. I tried to erase those images from my mind, and remain confident.
Turns out that this was "the" car trailer for loading low slung cars onto. Probably from the fact that the owner has a beautiful 37 Ford Hot Rod himself. His experience loading and unloading was a godsend, and the whole exercise was incident free. The hardest part was unraveling and then rolling back up again, the ratchet tie-down straps he had brought. They must have been 25' long..Why he needed such long ones.. I have no idea..a 37 Ford isn't that big.
His rod looked like a Boyd Cottington creation. Absolutely beautiful!
He currently has it listed for sale, complete with a enclosed car trailer. (Has now been Sold).

Anyhoo, off the the shop went the Roadster. (I believe my wife may have some pictures of it being loaded that I can post later.)
Big decision now..what color do I get it painted? I have some time before I have to decide, as he figured it may take him a month and a half before he's getting ready to paint. (Depends a lot on what regular work shows up in his shop)
I have narrowed it down to a dark green metallic, or a light silvery blue. No stripes at all.
I have always liked the look of the original Cobra CSX2472. Trouble is, looking at pictures on the net, can be misleading. every picture seems the car is slightly different, dependent on the lighting, camera, lens etc.

Same car.
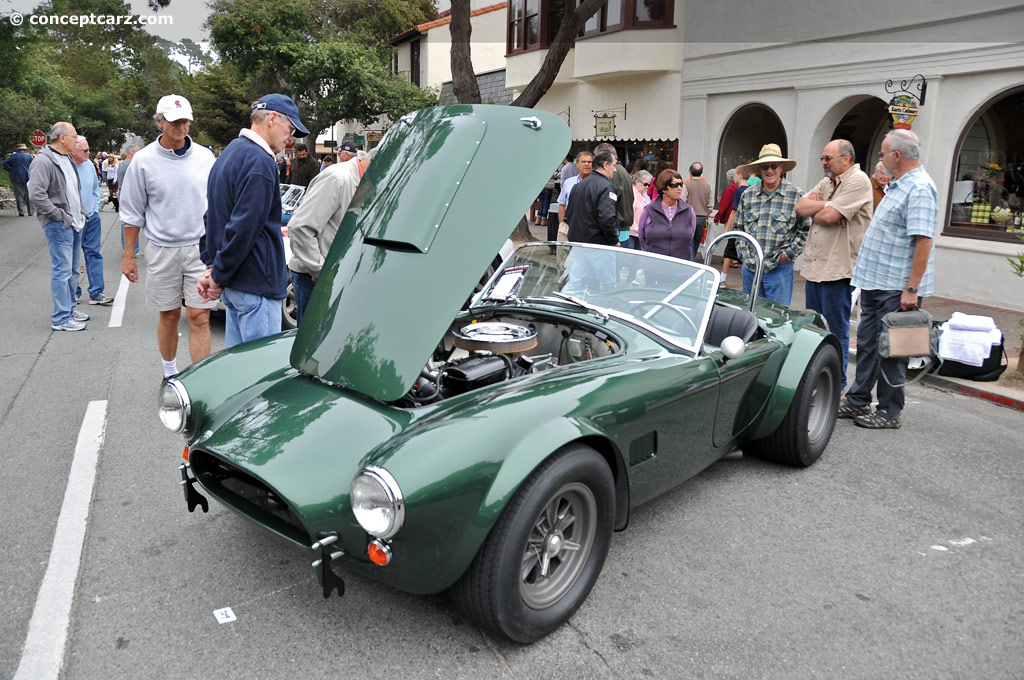
I was a bit worried, as the Cobra only has 4" of clearance. I had heard of some of the misadventures of these cars being loaded onto flat-decks, etc, and getting high centered. Of course we have all seen the U-Tube videos of cars, and trucks being loaded, and falling off the ramps, or the ramps shooting out from under the car, and the car rolling onto the ground on it's side. I tried to erase those images from my mind, and remain confident.
Turns out that this was "the" car trailer for loading low slung cars onto. Probably from the fact that the owner has a beautiful 37 Ford Hot Rod himself. His experience loading and unloading was a godsend, and the whole exercise was incident free. The hardest part was unraveling and then rolling back up again, the ratchet tie-down straps he had brought. They must have been 25' long..Why he needed such long ones.. I have no idea..a 37 Ford isn't that big.
His rod looked like a Boyd Cottington creation. Absolutely beautiful!
He currently has it listed for sale, complete with a enclosed car trailer. (Has now been Sold).
Anyhoo, off the the shop went the Roadster. (I believe my wife may have some pictures of it being loaded that I can post later.)
Big decision now..what color do I get it painted? I have some time before I have to decide, as he figured it may take him a month and a half before he's getting ready to paint. (Depends a lot on what regular work shows up in his shop)
I have narrowed it down to a dark green metallic, or a light silvery blue. No stripes at all.
I have always liked the look of the original Cobra CSX2472. Trouble is, looking at pictures on the net, can be misleading. every picture seems the car is slightly different, dependent on the lighting, camera, lens etc.
Same car.
Bil whatever Color you decide I am sure it will look sharp. I like blue myself I find rhey tend to pop more if that makes any sense. Green can get lost when taking pictures in the country of park setting but that is just me. Lol
TrueBlue02058
Post King
I would pick green if it was mine. Looks good , period correct and I have never seen one around here that color.
AC Bill
Well-known member
THE SNAKE CHANGES IT"S COLOR
From time to time i would pop in to see how the progress was. I didn't want him to feel pressured, so he wouldn't rush it, and cut some corners I may later regret. Just enough though, so he knew I was interested in what he'd done. It took awhile to see anything obvious, because much of the time he spent fitting the doors, hood, and trunk lid, getting all the gaps perfect. Of course soon after he rec'd it, business picked up again..murphys law..
One visit I paid, about a 5-6 weeks after towing it to him.. I was very happy to see some actual body work getting done. He had been working on the mold parting lines, using HSRF. This product has the proper vinylester resin that the FFR body is made from, and is different then the more common polyester resins. After the HSRF, it has to cure for at least a week to allow for any shrinkage.
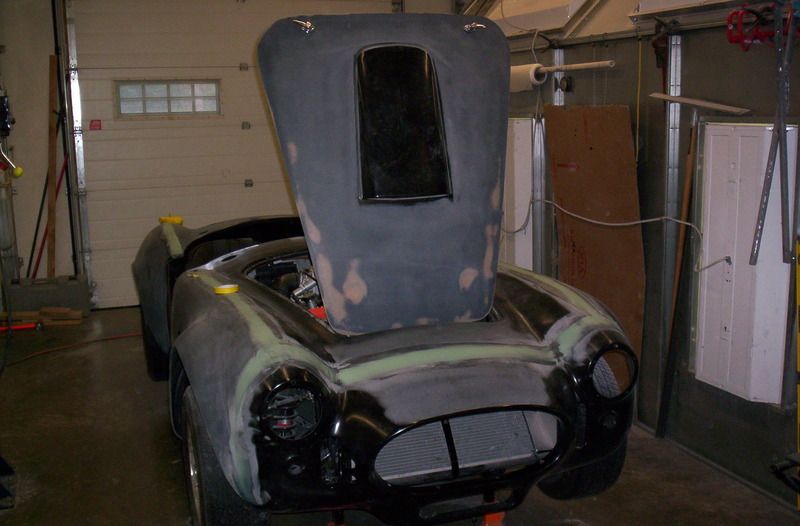
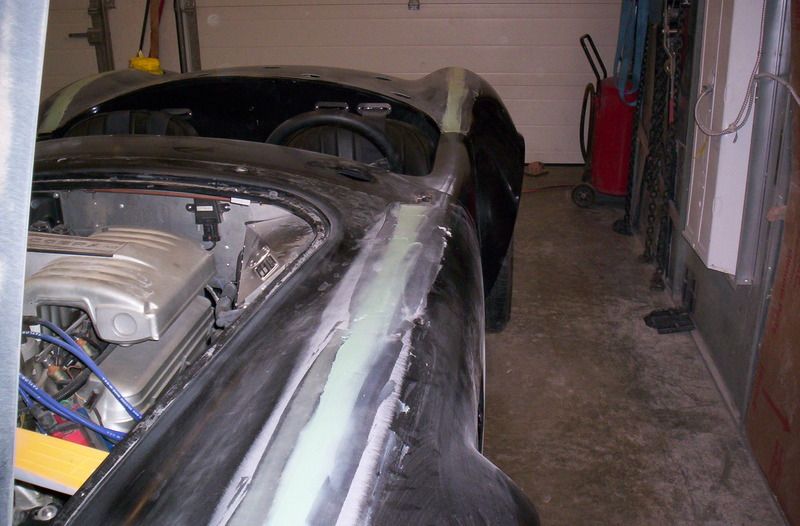
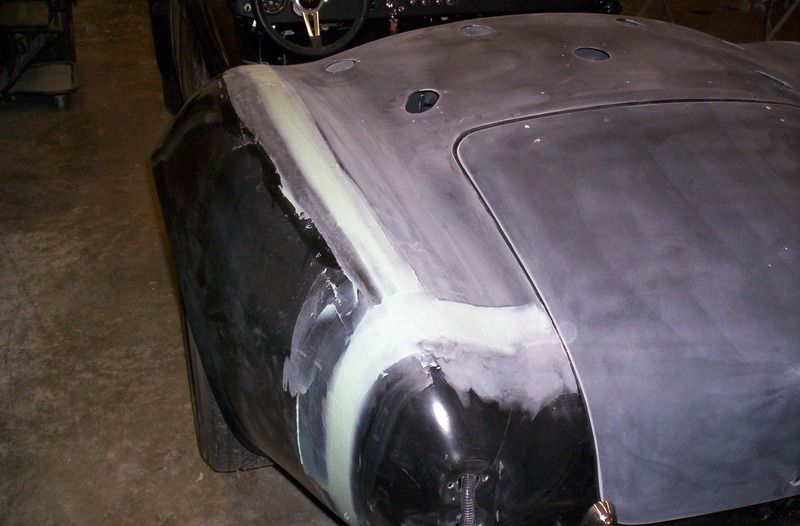


AC Bill
Well-known member
SNAKE SKIN CONTINUED....
So another 5 weeks go past, and now I am really starting to see some progress when I stop in for a visit.
These pictures were taken shortly after two coats of Slick Sand, a high build primer had been sprayed.

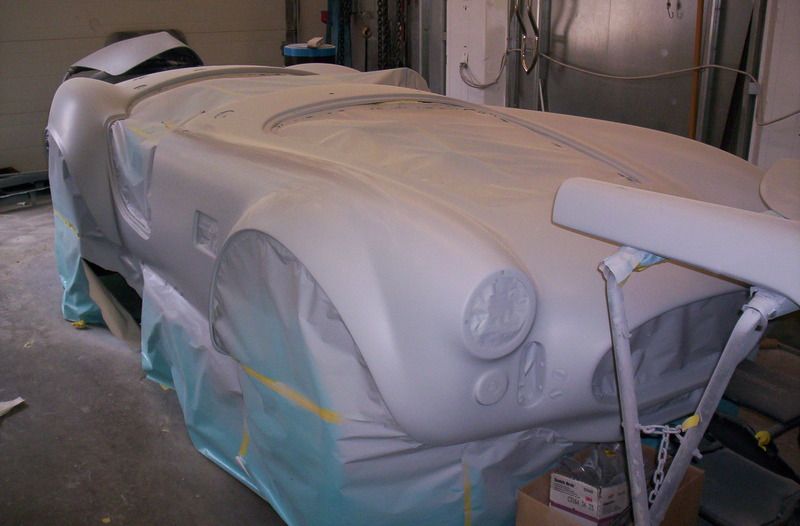
Some more sanding will take place, a little spot putty applied as needed, then a final coat of Slick Sand will be sprayed. One final block sanding, then a final sealing primer is applied. He decided to ting the seal primer black to prevent any bleed thru, which can occur with some dark colored metallics, if a light color primer is used...Next comes the paint !
AC Bill
Well-known member
THE NEW SKIN !
IVY GREEN METALLIC
Popped in a the last week of June to see how the Cobra was looking, and I was so excited to see it had made it into the paint booth, for what should be the final time. The inner's of the doors, trunk lid and hood had already been painted, as well as the door jams, trunk and hood lips.
Later this week it will be done, Dan said. Sweet words. I've been missing some fantastic driving weather..and getting anxious.
So I get a call this morning (June 30th) that it's all done. (Well, almost all done...He's still wants to wet sand and polish it) I paid a visit so I could see what it looked like with it's new color skin.
As is usually the case, you can't really see the true color in a picture, especially one that's indoors, with artificial lighting. I took the small scoop out in to the sun.. and wow what a difference ! The underlying silvery metallic becomes clearly visible in sunlight.
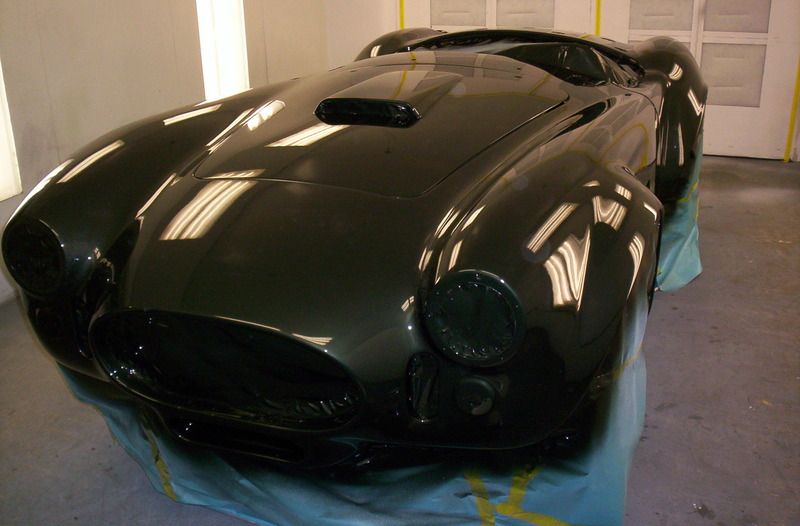
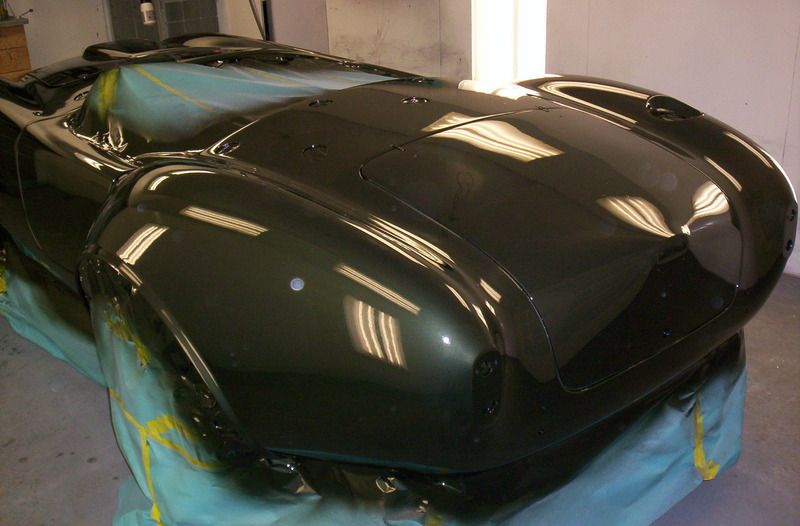
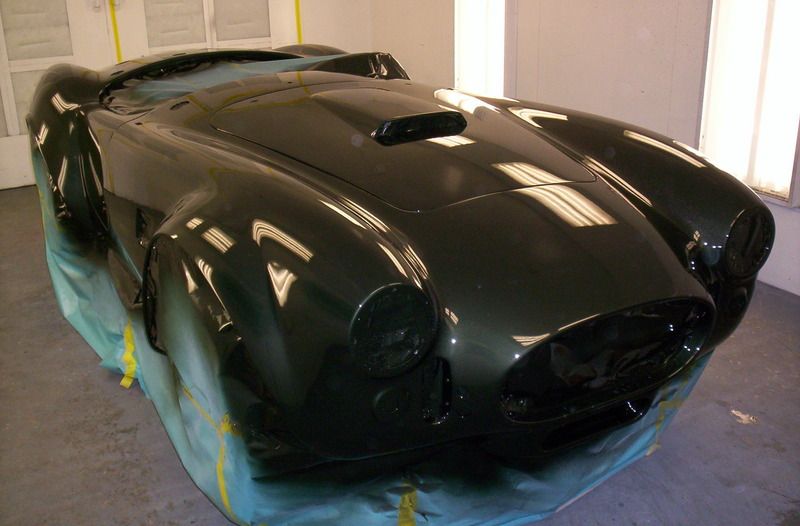
So a few more days and it will be back home, and I can start to re-install the lights, roll bars, side-pipes, etc. My biggest concern is scratching it while doing the re-installation. I guess if it happens it happens..the first one's always the worst..lol
IVY GREEN METALLIC
Popped in a the last week of June to see how the Cobra was looking, and I was so excited to see it had made it into the paint booth, for what should be the final time. The inner's of the doors, trunk lid and hood had already been painted, as well as the door jams, trunk and hood lips.
Later this week it will be done, Dan said. Sweet words. I've been missing some fantastic driving weather..and getting anxious.
So I get a call this morning (June 30th) that it's all done. (Well, almost all done...He's still wants to wet sand and polish it) I paid a visit so I could see what it looked like with it's new color skin.
As is usually the case, you can't really see the true color in a picture, especially one that's indoors, with artificial lighting. I took the small scoop out in to the sun.. and wow what a difference ! The underlying silvery metallic becomes clearly visible in sunlight.


So a few more days and it will be back home, and I can start to re-install the lights, roll bars, side-pipes, etc. My biggest concern is scratching it while doing the re-installation. I guess if it happens it happens..the first one's always the worst..lol