1983 GL, project: Cheap Thrills

Ohtobbad;n16447 said:
Starting to take shape, going to look good when all done.
You can for sure say its custom built.

Yep. Not much left of the original car that I haven't cut, chopped, welded, ripped out or changed. Half a floor pan and some sheet metal around the rear seat/hatch area.

Ultimately, the goal is to have something that looks like Ford could have built it that way. That's a lot of the reason for my preference for mix and matching (or tweaking) oem parts.

I want the average joe to walk by and think "nice old mustang" but the guy who knows fox mustangs to walk by, do a double take, seeing a different little thing each time he looks a little closer.....

:)
 
Last edited:
I like your thought process! "Built like it could / should have been when new"

I've used much the same thoughts on my modifications which were minor compared to your project. It's getting closer to the road course every bolt you install and torque for the last time.
 
2001BlackGTvert;n16429 said:
Man you are doing a fantastic job on that car.loving the thread.

You would be an awesome guy to have around a custom build. You seem to always come up with a good solution for that situation that creeps up.

Machines and I always have gotten along. People are a different story. I can understand a machine. People? Almost always a complete mystery to me.

I'm the guy you can put a bucket of parts in front of and whatever it is I'll put it together and it will work. Then I'll take it apart again and make it work better.

if a machine doesn't exist or needs some fabrication/alteration....I'm your guy.

Machines are my special "gift".

:)
 
Last edited:
Take one LX bumper and apply dremel: [IMG2=JSON]{"data-align":"none","data-size":"full","src":"http:\/\/www.supermotors.net\/getfile\/1117450\/fullsize\/fr_2174-copy.jpg"}[/IMG2]


Slip on to chopped GT bumper and: [IMG2=JSON]{"data-align":"none","data-size":"full","src":"http:\/\/www.supermotors.net\/getfile\/1117451\/fullsize\/fr_2175-copy.jpg"}[/IMG2]


Looks pretty good!

I was going to just use the lower lip, but Figured I'd cut it above the embossed "MUSTANG" and see what it looks like. I like the look, so it will stay. I think it makes it look just a smidge more OEM.

Now to fit and graft them together.

;)


PS: if anyone needs a new dremel tool, Home depot has the Dremel 4000 model on special for 59.99. Same one is 124.99 everywhere else. I thought it was a mistake when I saw it on their website, but sure enough its tagged as 59.99 in the store too.
 
Last edited:
Cut and inserted:
[IMG2=JSON]{"data-align":"none","data-size":"full","src":"http:\/\/www.supermotors.net\/getfile\/1117457\/fullsize\/img_5989.jpg"}[/IMG2]


[IMG2=JSON]{"data-align":"none","data-size":"full","src":"http:\/\/www.supermotors.net\/getfile\/1117458\/fullsize\/img_5988.jpg"}[/IMG2]

Hard to tell from the crappy pic, but it looks good and fits well. Just what it needed.

The LX lower piece also incorporates a lower "bracket" that lines up perfectly with the metal bumper understructure. So the fascia is now bolted at both the upper and lower surface, which will give it proper support and keep everything from sagging in the future.

All i need to finish it is to bond the pieces together and then its just good ol' fashioned body work.

Very pleased with how its coming out, especially for the price (couple hundred at best, including buying all the oem pieces I've cut and spliced together).

Definitely going to be a "one of a kind" piece!

:)
 
Last edited:
great white;n16215 said:
well, here's some info for ya:

Got a fox? considering BBK longtubes? PLus a BBK H pipe?

Don't.

They fit together in a fox like crap.

I had to tweak the headers pretty good to fit and clear the under-hood parts and they still don't end up underneath where they need to be.

The H pipe is too long to fit with the MM front mount with for the torque arm. I've had to cut the front flanges off, section the pipe and re-weld for proper length. The bends do not line up to place the rear flange on the chassis properly, the hangars are bent wrong, The final "finger in the eye" is I had to cut the crossover pipe out as it wouldn't let hte two pipe runs lie where they would fit and clear.

Normally, I would say it doesn't fit because of all the aftermarket parts, but you would expect BBK headers to work with BBK pipes in the same chassis.

At least I only paid 150 bucks for the headers and the H-pipe. I'll get it to all work together, but what a major PITA.....

Yep, they gave me a lot of headache when I installed mine.

But the sound they make compared to my old BBK shorties/Mac Pro Chamber combo is awesome!
 
Well, wife went into town today so I'd thought I'd work on the car. I fought with that bloody little garage for a while and had to just throw down tools and walk away. It's literally 10 pounds of crap in a 5 pound bag.

Both my bikes are out in the rain as well as the pressure washer and it's still so packed I'm tripping and moving things around more than I'm working. It was just beyond frustration so I had to walk away.

But, the good note is that we've been looking at building a house. It's still ocal, but it's going to be beyond what the local market will support for resale. Like somewhere around $100,000 above market. We're considering going so far over as we are looking at it as the last (IE:retirement) home and if we are going to live in it "forever", it's going to be what we want.

Now, that's a lot of money for the area and when we're both on fixed incomes (well, indexed pensions) ithe mortgage is going to eat up a good share of our funds. BUt we don't drink, we don't party, we don't travel (done enough of that already thanks) and the house is pretty much our world. Seems to make sense that's where our funds should go.

Here's one of the layouts we're considering:

yard-postioning-copy.jpg


Yup, two garages. Not going to cram myslef into a single car garage any more!

:)
 
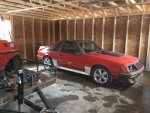
Side skirts are hung: [IMG2=JSON]{"data-align":"none","data-size":"full","src":"http:\/\/www.supermotors.net\/getfile\/1117808\/fullsize\/wmimg_6007.jpg"}[/IMG2]


It was a lot of measuring and a major PITB.

Took a lot of measuring, staring and thinking to build up the courage to drill ten 3/16" holes into the perfectly good 34 year old rocker panels.

:eek:

The pieces are really close to perfect, but needs a fraction of an inch here and there to be right enough for my ocd to settle down. Probably good enough for anyone else, but it's just "one of those things" with me.

Ah, the joys of working with 1980's plastic...:rolleyes:

I'm a bit torn on what to do about that "Mustang GT" embossed into the side skirts. It's gotta go, since it's not a GT, nor is it intended to "fake" being a GT. It's just a "Mustang", albeit a heavily breathed on one.

Since I've left just "Mustang" on the rear bumper, I could just remove the "GT" on the side skirts. but I'm not so sure I'd like the Mustang set back so far. That would, however, be the easiest way to go and get it to look right with a filler piece.

I suppose I could just cut out the whole "Mustang GT", chop off the "GT" and slide the "mustang part forward. That would match the 'Mustang" on the rear bumper and tie it all together. That feels like what Ford would have done, which is another plus for that idea. But it's also more work and a bigger chance of messing it up.

The other option is removing the whole thing, but that would be very hard to make look right as the whole area has a concave curve to it. very hard to match.

Well, lots of time to think about it......I'm leaning towards chopping out "GT" and sliding the "Mustang" bit forward.

:)
 
Last edited:
Well crap.

Just as I was warming up to just having "Mustang" on the rocker panel, I realized that the drivers side is going to be reversed. Meaning; the Mustang is going to be about 5-6 inches further forward. Great for just filling in the "GT", but it will drive me nuts knowing one isn't spaced the same as the other side. It means I'll be locked into cutting up the passenger side and trying to make it look decent again with body work.

I think I'm just going to scuff all the letters up on both sides and fill them in. Seems the easiest way out of this problem.

That's more along the understated lines I'm going for anyways, leaving just the Tri-Bar Pony emblem on the side.
 
Not much going on with the 83 lately. finished our new house (in construction pic attached) and moved in .The 83 is now in it's new home. once we get settled (and get our previous house sold), work will begin again.

Except, this time, I won't be stuck in a one car rat hole......
 

Attachments

  • photo2195.jpg
    photo2195.jpg
    149.9 KB · Views: 0
  • photo2196.jpg
    photo2196.jpg
    203.3 KB · Views: 0
Back
Top