S197CS
Corner Carver
As some of you have requested, I figured I would do a write-up on the method I’ve been using to perform the maintenance wash on all my vehicles. Maintenance wash meaning this is the method that I use to wash my cars once a week (or more, depending how I feel) in the Spring to fall time as I do not have a Garage at my current house. Winter is Kind of a season I hate due to my cars always being filthy. I tend to avoid automated washes, but that must be just me (the touchless washes kinds have, For Everyone's Information, VERY strong soaps, that usually break down any traditional waxes and is hurting the paint sealants performance if not stripping them altogether. They have to, to remove all that grime without touching your car, think about it.). I Personally do not have any of my cars ceramic coated, but I’ll leave paint protection types, pros and cons to a separate discussion.
I will be leaving a link to a couple of Canadian Detailing Products Web Wholesalers that I’ve used in the past with great luck. They are the primary source to all of my car detailing products arsenal, usually ordering once or twice per winter to prepare for the next car season. If some of you are interested to see that car detailing products collection of mine, let me know and I could create another post if enough people are curious.
***DISCLAIMER: Always wash cars in the shade if you can help it. Washing a car in the sun is far from optimal. Garage is even better if you have access to one of these things.
Wheel Cleaning
I always clean my wheels first. They are usually the dirtiest portion of any cars. My method is not 100% finished, meaning I am still looking for the perfect method as far as which wash tools I am using.
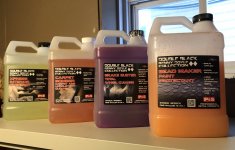
Always work one wheel at a time. I always start by rinsing down the wheel. From there, I am using P&S Brake Buster diluted 10:1 (10 parts water, 1 part liquid) in my IK Sprayers Foam Pro2 to create a rich foam on the wheel.
IK Foam Pro2 - This sprayer is a perfect alternative to create good foam without the use of a pressure washer. (Since I’ve bought a pressure washer gun/hose upgrade kit that came with a better quality foam cannon, I’ll be transitioning next summer to using my current foam cannon for the Brake Buster application.)
P&S Brake Buster is a very good wheels and tires cleaning product that is extremely costs effective to procure (1 gallon of the product costs $29.99, and in my application I am diluting it 10:1, further stretching how much use I get from my gallon). Note that it’s NOT necessary to foam Brake Buster to use it. If you buy the 16Oz bottle, it will come with a traditional trigger sprayer. It can be used straight or diluted as I do.
Spray a generous amount of Brake Buster on the wheel and let it work on the surface for a minute or so. DO NOT LET IT DRY ON THE SURFACE! (Same note of caution to be used with any washing liquids for that matter…). Then Start agitating the solution on the wheel with your favorite wheels and tires brushes, microfiber cloth or dedicated wheel mitt. I personally at this stage have my wheel brushes soaking in a 3.5Gal bucket in soapy water. This bucket is ONLY used for washing the wheels, NEVER to be used for washing the paint (as wheels are extremely dirty and the contaminants pulled out of them WILL scratch the paint).
Once the wheel have been cleaned, rinse away!


Rinse
I Will start with this disclaimer: I am using a pressure washer. Not everyone have a pressure washer and that’s alright. It simply suits my prefered method better. Note that I will be talking about alternatives to activities being done with the pressure washer when necessary.
Anytime I wash the car, I start with a good rince down. With the pressure washer it allows to remove any most of the big dirt from the surface.
Presoak/Prewash
This is the stage where I will attach my foam cannon to my pressure washer and cover the car with suds. Up to now, I’ve been using Adam’s Polishes Car Wash soap, but for the season coming will be transitioning to the P&S Pearl Auto Shampoo. Simply want to try this one as it has a lot of good reviews and it’s very economical to purchase ($28/gal compared to $51/gal for the Adam’s Polishes product). When using the foam cannon, I am diluting my soap 10:1 with water (10 parts water for 1 part soap, if possible I usually use my fridge’s filtered water, hard water tends to kill the foaming action of any car washes soaps) to create the best suds. USE A PURE SOAP!! What I mean by this, not a soap with any gloss enhancers, fillers, waxes, etc. Your Foam Cannon will thank you on the long run and you'll have better foam anyways. These two soaps are such soaps, only, simply soaps. There are also purpose made foam cannon soaps (Adam's Polishes Mega Foam, Turtle Wax Ice Snow Foam, Chemical Guys Honeydew Snow Foam to name only a few) If you want to use a dedicated foam soap.
Simply foam the car and let it run down the surface. The theory behind this is that the soap/foam encapsulate bigger/loose surface contaminants and bring it down with it as it’s run down to the ground. I have to say, it’s a pretty satisfying experience as well.
Then, different people use different method. Some are rinsing off the suds, some are going immediately to the contact wash (mitt/pad wash). I tend to prefer to rinse my car down prior to advancing to the contact wash portion of my process.


2 Buckets Contact Wash
For the contact wash stage (where you actually rub on the car’s paint with a mitt, pad, or other wash media of sort), I always use a lot of caution. As probably most of you know, the dreaded swirls that we find on our cars are more often than not being installed on the car as we wash/touch them. That’s why they are often called love marks. To try to avoid this happening the most as I can, I am always using the two buckets methods when I wash.
It is as simple as it sounds: Use two buckets while washing the car. One with your clean water and soap, the second one being your Rinse bucket. Also, always have grit guards/dirt guards inserts at the bottom of your buckets when possible, these are trapping all the dirt pulled away from the car from coming back into your washing water.
I dunk my wash pad in the Wash bucket, cleaning only one panel per side of my pad, then rinsing my pad into the Rinse bucket before dunking again in the wash bucket for the next panel. This allows all the dirt picked up by my wash pad to drop into the rinse bucket instead of the Wash water, thus ensuring the water/soap solution stays clean of contaminants through the entire wash process. If you’re interested I used either The Rag Company wash pad or Microfiber Madness Wash pad (depending which one’s clean when I’m washing the car).


I go through the entire car, one panel at a time using this method. Here’s a youtube link to said method ‘’tutorial or how to’’ that better explains that written words can do. Actually, I am using pretty much the same method as him. Pan’s Youtube channel is extremely good if you are interested in any ways to car detailing (he has around 575K subscribers at the time of writing this, this particular video having been viewed 1,560,115 times (!!!!)).
From here, I simply rinse the car down using my pressure washer.
***As some of you Might have picked up while reading all this, my wash method actually is a 3 Buckets method, as I am using a dedicated 3.5Gal bucket for the wheel cleaning stage. I certainly do NOT want to take the chances scratching more the car by introducing the contaminants removed from my wheels onto my paintwork.
I will be leaving a link to a couple of Canadian Detailing Products Web Wholesalers that I’ve used in the past with great luck. They are the primary source to all of my car detailing products arsenal, usually ordering once or twice per winter to prepare for the next car season. If some of you are interested to see that car detailing products collection of mine, let me know and I could create another post if enough people are curious.
***DISCLAIMER: Always wash cars in the shade if you can help it. Washing a car in the sun is far from optimal. Garage is even better if you have access to one of these things.
Wheel Cleaning
I always clean my wheels first. They are usually the dirtiest portion of any cars. My method is not 100% finished, meaning I am still looking for the perfect method as far as which wash tools I am using.
Always work one wheel at a time. I always start by rinsing down the wheel. From there, I am using P&S Brake Buster diluted 10:1 (10 parts water, 1 part liquid) in my IK Sprayers Foam Pro2 to create a rich foam on the wheel.
IK Foam Pro2 - This sprayer is a perfect alternative to create good foam without the use of a pressure washer. (Since I’ve bought a pressure washer gun/hose upgrade kit that came with a better quality foam cannon, I’ll be transitioning next summer to using my current foam cannon for the Brake Buster application.)
P&S Brake Buster is a very good wheels and tires cleaning product that is extremely costs effective to procure (1 gallon of the product costs $29.99, and in my application I am diluting it 10:1, further stretching how much use I get from my gallon). Note that it’s NOT necessary to foam Brake Buster to use it. If you buy the 16Oz bottle, it will come with a traditional trigger sprayer. It can be used straight or diluted as I do.
Spray a generous amount of Brake Buster on the wheel and let it work on the surface for a minute or so. DO NOT LET IT DRY ON THE SURFACE! (Same note of caution to be used with any washing liquids for that matter…). Then Start agitating the solution on the wheel with your favorite wheels and tires brushes, microfiber cloth or dedicated wheel mitt. I personally at this stage have my wheel brushes soaking in a 3.5Gal bucket in soapy water. This bucket is ONLY used for washing the wheels, NEVER to be used for washing the paint (as wheels are extremely dirty and the contaminants pulled out of them WILL scratch the paint).
Once the wheel have been cleaned, rinse away!
Rinse
I Will start with this disclaimer: I am using a pressure washer. Not everyone have a pressure washer and that’s alright. It simply suits my prefered method better. Note that I will be talking about alternatives to activities being done with the pressure washer when necessary.
Anytime I wash the car, I start with a good rince down. With the pressure washer it allows to remove any most of the big dirt from the surface.
Presoak/Prewash
This is the stage where I will attach my foam cannon to my pressure washer and cover the car with suds. Up to now, I’ve been using Adam’s Polishes Car Wash soap, but for the season coming will be transitioning to the P&S Pearl Auto Shampoo. Simply want to try this one as it has a lot of good reviews and it’s very economical to purchase ($28/gal compared to $51/gal for the Adam’s Polishes product). When using the foam cannon, I am diluting my soap 10:1 with water (10 parts water for 1 part soap, if possible I usually use my fridge’s filtered water, hard water tends to kill the foaming action of any car washes soaps) to create the best suds. USE A PURE SOAP!! What I mean by this, not a soap with any gloss enhancers, fillers, waxes, etc. Your Foam Cannon will thank you on the long run and you'll have better foam anyways. These two soaps are such soaps, only, simply soaps. There are also purpose made foam cannon soaps (Adam's Polishes Mega Foam, Turtle Wax Ice Snow Foam, Chemical Guys Honeydew Snow Foam to name only a few) If you want to use a dedicated foam soap.
Simply foam the car and let it run down the surface. The theory behind this is that the soap/foam encapsulate bigger/loose surface contaminants and bring it down with it as it’s run down to the ground. I have to say, it’s a pretty satisfying experience as well.
Then, different people use different method. Some are rinsing off the suds, some are going immediately to the contact wash (mitt/pad wash). I tend to prefer to rinse my car down prior to advancing to the contact wash portion of my process.
2 Buckets Contact Wash
For the contact wash stage (where you actually rub on the car’s paint with a mitt, pad, or other wash media of sort), I always use a lot of caution. As probably most of you know, the dreaded swirls that we find on our cars are more often than not being installed on the car as we wash/touch them. That’s why they are often called love marks. To try to avoid this happening the most as I can, I am always using the two buckets methods when I wash.
It is as simple as it sounds: Use two buckets while washing the car. One with your clean water and soap, the second one being your Rinse bucket. Also, always have grit guards/dirt guards inserts at the bottom of your buckets when possible, these are trapping all the dirt pulled away from the car from coming back into your washing water.
I dunk my wash pad in the Wash bucket, cleaning only one panel per side of my pad, then rinsing my pad into the Rinse bucket before dunking again in the wash bucket for the next panel. This allows all the dirt picked up by my wash pad to drop into the rinse bucket instead of the Wash water, thus ensuring the water/soap solution stays clean of contaminants through the entire wash process. If you’re interested I used either The Rag Company wash pad or Microfiber Madness Wash pad (depending which one’s clean when I’m washing the car).
I go through the entire car, one panel at a time using this method. Here’s a youtube link to said method ‘’tutorial or how to’’ that better explains that written words can do. Actually, I am using pretty much the same method as him. Pan’s Youtube channel is extremely good if you are interested in any ways to car detailing (he has around 575K subscribers at the time of writing this, this particular video having been viewed 1,560,115 times (!!!!)).
From here, I simply rinse the car down using my pressure washer.
***As some of you Might have picked up while reading all this, my wash method actually is a 3 Buckets method, as I am using a dedicated 3.5Gal bucket for the wheel cleaning stage. I certainly do NOT want to take the chances scratching more the car by introducing the contaminants removed from my wheels onto my paintwork.
") . That’s one of the reasons my drying process is not optimal.
. That’s one of the reasons my drying process is not optimal.") .
.